

In the world of high-precision manufacturing, a fraction of a millimeter is the difference between a high-performance machine and a catastrophic failure. Whether you are adjusting valve clearances in a high-performance engine or setting the gap on a critical industrial turbine, the tool you rely on most is the humble feeler gauge.
However, a tool is only as good as its last calibration. At the professional level, feeler gauge calibration (or feeler gage calibration) is not just a maintenance task—it is a rigorous scientific process that ensures your measurements stand up to international standards.
In this guide, we dive deep into the technicalities of calibrating thickness gauges, why “stacking” leaves is a dangerous habit, and how NIST traceability protects your bottom line.

1. Why Calibration is Non-Negotiable: The Cost of Error
The Microscopic Cost of Error
In precision manufacturing, “close enough” is a liability. A fraction of a millimeter is the difference between optimal performance and catastrophic failure.
Critical Tolerance
One ten-thousandth of an inch. Loss of this material can throw turbines and engines out of balance.
The “Invisible” Error
Added thickness caused merely by residual oil or dust on a leaf, doubling the error margin.
Impact of Contaminants on Precision
Comparing a clean calibration surface to one with common contaminants.
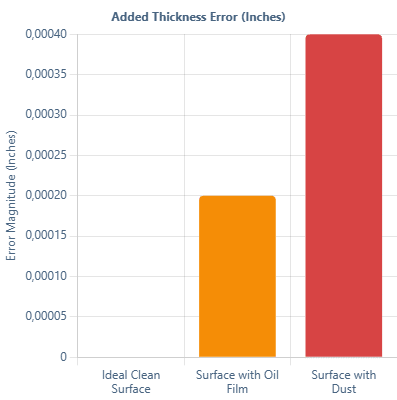
Source: Lab Metrology Data
In professional environments, “close enough” is never enough. The primary purpose of a feeler gauge is to measure the physical space between two parts. Over time, repeated use leads to friction wear. Even a loss of $0.0001″$ (one ten-thousandth of an inch) can throw a sensitive system out of balance.
Material Wear & Tear
Every time a leaf is slid into a gap, microscopic amounts of material are shaved off. In high-volume automotive or aerospace environments, this wear is accelerated. Without regular thickness gauge calibration, your technicians may be “zeroing” machines based on false data.
Compliance & Audits
For shops operating under ISO 9001 or AS9100, uncalibrated tools are a major non-conformity. Auditors look for the calibration sticker not just for safety, but as proof of a functioning Quality Management System (QMS).
2. Pre-Calibration: The Science of Preparation
The Science of Preparation
Precision is a slave to thermodynamics. Professional calibration begins long before the first measurement is taken.
Arrival & Stabilization
Tools are soaked in a controlled environment at 20°C (68°F).
24 Hours Minimum
Microscopic Cleaning
Removal of all anti-corrosion oils and particulate matter.
Lint-Free Solvents
Visual Inspection
Checking for burrs, nicks, or tapered wear patterns.
Optical Check
A common mistake in DIY calibration is ignoring the environment. Precision measurement is a slave to physics, specifically thermodynamics.
The 24-Hour Thermal Stabilization Rule
At leading US metrology labs, feeler gauges are never measured immediately upon arrival. Steel expands and contracts with temperature changes. We implement a thermal stabilization period, where the gauges are kept in a climate-controlled room at $20\text{°C} \pm 1\text{°C}$ ($68\text{°F}$) for at least 24 hours. This ensures the metal has reached a “neutral” state, eliminating thermal expansion variables.
Physical Inspection & Cleaning
Before the first measurement is taken, each leaf undergoes a microscopic inspection:
-
Burrs and Nicks: Even a tiny raised edge on the corner of a leaf will cause an artificially high reading.
-
Cleaning: We use non-corrosive solvents and lint-free cloths. Residual oil or dust can add $0.0002″$ to a thickness measurement—a massive error in precision work.
3. Professional Calibration Procedure: The Lab Process
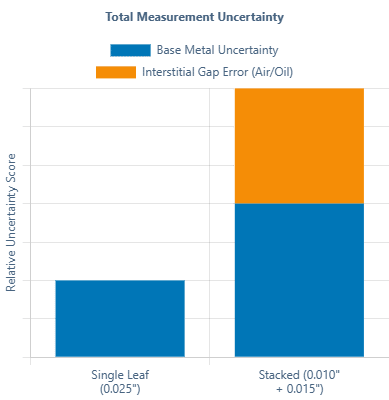
The Danger of “Stacking”
Technicians often stack leaves (e.g., 0.010″ + 0.015″) to measure a 0.025″ gap. This is a cumulative risk. Every leaf introduces its own uncertainty, and the microscopic “interstitial gap” (air/oil between leaves) adds false thickness.
⚠
Cumulative Error: Tripling the leaves triples the uncertainty budget.
⚠
Interstitial Gap: No surface is perfectly flat. Air pockets create a “springy” false reading.
Always use a single leaf or a custom-ground shim for critical measurements.
Single vs. Stacked Uncertainty
Visualizing why 1 + 1 does NOT equal 2 in precision metrology.
Professional gap gauge calibration involves more than just checking the thickness; it’s about verifying the geometry of the tool.
Step 1: Master Reference Comparison
We utilize Grade 0 or Grade K Gage Blocks as our primary reference. These blocks are themselves calibrated to NIST standards, providing an unbroken chain of traceability.
Step 2: Multi-Point Testing
A leaf might be accurate at the tip but worn thin in the middle. A professional lab performs measurements at multiple points along the length of the leaf to ensure parallelism and flatness. If a leaf is “tapered” due to uneven wear, it must be decommissioned.
Step 3: The “Slight Drag” vs. “Forced Fit”
Calibration technicians are trained in the “art of feel.”
-
Slight Drag: The leaf should move with the resistance of a piece of paper being pulled from under a phone.
-
Forced Fit: If you have to muscle the gauge into the gap, you are flexing the metal, which leads to an inaccurate, “tight” reading.
4. The Danger of “Stacking” Leaves: A Cumulative Risk
Technicians often “stack” leaves to achieve a specific dimension (e.g., combining $0.010″$ and $0.015″$ to measure a $0.025″$ gap). While convenient, this is a nightmare for precision.
Cumulative Error
Every calibrated leaf has a small “uncertainty” budget. When you stack three leaves, you are tripling that uncertainty.
The Interstitial Gap
No two surfaces are perfectly flat. When you stack leaves, microscopic layers of air, oil, or dust get trapped between them. This “interstitial buildup” can make a stack of leaves significantly thicker than the sum of their individual parts.
Pro Tip: For the highest accuracy, always use a single leaf. If the required size doesn’t exist, use a dedicated Thickness Gage or custom-ground shim.
5. Understanding NIST Traceability and ISO 17025
When searching for feeler gage calibration services, the terminology can be confusing. Here is what you need to know to stay compliant in the US market:
NIST Traceable Calibration
This means the lab can prove, through a documented “paper trail,” that their master tools were calibrated by a higher authority, eventually leading back to the National Institute of Standards and Technology (NIST).
ISO/IEC 17025 Accredited Reports
This is the “gold standard.” An 17025 accredited report includes:
-
As-Found Data: How the tool measured when it arrived (critical for determining if your previous production batches are at risk).
-
As-Left Data: The measurements after cleaning or adjustment.
-
Measurement Uncertainty: A statistical value that tells you exactly how much “doubt” exists in the measurement.
6. Maintenance & Storage: Prolonging Accuracy
Furthermore, you can follow these laboratory-grade storage tips to extend the life of your thickness gauge calibration:
-
First, Prevent Corrosion: Since most feeler gauges use high-carbon steel, they tend to rust easily. To prevent this, always apply a thin film of moisture-displacing light oil before storing them.
-
Next, Stop “The Snap”: Avoid snapping the leaves back into the handle like a pocketknife. Instead, fold them gently, as this aggressive motion causes micro-dents on the precision edges.
-
Finally, Use Dedicated Storage: In addition to careful handling, keep your gauges in a padded case. Specifically, store them away from vibrating machinery or magnetic fields, because these environments attract harmful metallic dust to the leaves.
7. Conclusion: Precision is a Choice
“A feeler gauge is a simple tool, but the science behind its accuracy is complex. By prioritizing calibration and understanding NIST traceability, you protect your equipment from wear and your company from liability. Don’t leave precision to chance. Whether you call it a thickness gauge, a gap gage, or a leaf gauge, let professionals who understand the ‘feel’ of accuracy verify your tools.
