

In the world of precision manufacturing, what you can’t see can definitely hurt your bottom line. You rely on your coating thickness gauge to ensure quality, but when was the last time you truly verified its accuracy? A drift of just a few microns—invisible to the eye—can lead to catastrophic failures: premature corrosion, non-compliance with international standards, or massive material wastage. For many facilities, an uncalibrated gauge is a ticking time bomb of “silent rejects” and potential recalls that can destroy a brand’s reputation overnight. The solution isn’t just checking your device against a plastic shim; it’s utilizing a professional ISO 17025 coating thickness calibration service to implement a rigorous coating thickness gauge calibration strategy that aligns with global metrology standards.
Overview of Coating Thickness Gauges and Applications
A coating thickness gauge (often called a digital coating thickness tester) is a precision instrument used to measure the depth of a coating (like paint, lacquer, or plating) without damaging the substrate.
In the industrial world, these devices are the gatekeepers of quality. From the automotive industry, where paint thickness prevents corrosion, to the aerospace sector, where precise plating ensures structural integrity, the applications are vast.
Modern devices typically utilize two physical principles:
- Electromagnetic Induction: Used for non-magnetic coatings (paint, zinc) on magnetic substrates (steel, iron).
- Eddy Current: Used for non-conductive coatings (anodizing, paint) on non-ferrous metal substrates (aluminum, copper).
The Critical Importance of Calibration
Why is coating thickness gauge calibration non-negotiable?
Accuracy is not a permanent state; it is a temporary condition. In a professional setting, a gauge that hasn’t been calibrated is merely a “guessing tool.” Calibration establishes a relationship between a known standard (certified foils or shims) and the value indicated by your instrument.
Using an ISO 17025 coating thickness calibration service provides traceability. This means your measurements can be traced back to national or international standards (like NIST), which is essential for global trade and high-stakes engineering projects.
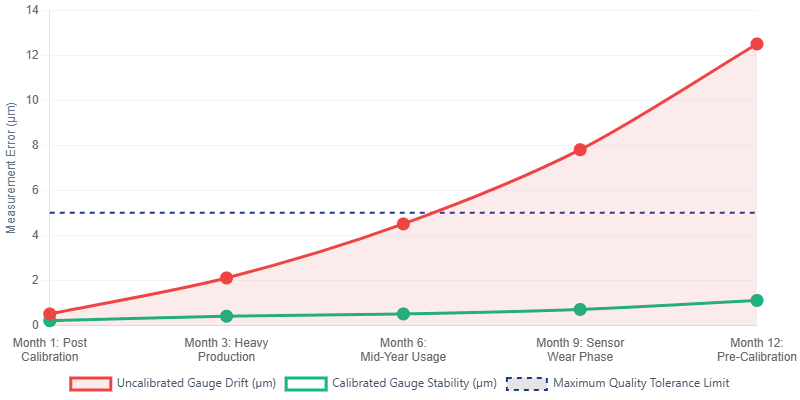
The Danger of Measurement Drift
Accuracy is a temporary condition. This chart demonstrates how internal sensor wear and environmental factors cause uncalibrated gauges to drift beyond acceptable quality tolerances over a 12-month cycle.
The ISO/IEC 17025 Calibration Procedure
ISO 17025 Calibration Procedure
Professional laboratory calibration follows a strict, legally traceable methodology.
Environmental & Visual Inspection
Inspect probe tip for micro-abrasions causing non-linearity.
Mastering the Zero-Point
The foundation of accuracy. Establishes the baseline on a bare substrate.
- Match zero plate alloy and curvature exactly to production parts.
- Clean plate with isopropyl alcohol.
- Verify consistent 0.0 µm readings.
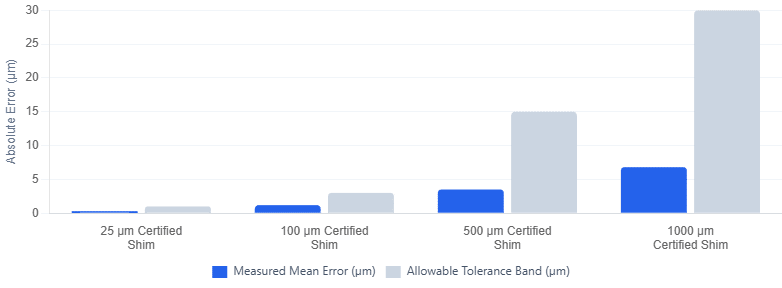
Multi-Point Verification
Testing 3 to 5 points across the functional range using NIST-traceable certified shims.
Calculating Uncertainty
A valid ISO 17025 certificate must include a Statement of Uncertainty factoring in:
Display Resolution
Foil Uncertainty
Environmental Flux
To achieve professional-grade results, the calibration must follow a structured, documented process. Here is the technical breakdown of a standard digital coating thickness tester calibration under laboratory conditions.
Phase 1: Environmental and Visual Inspection
Before any measurements are taken, the laboratory environment must be stabilized.
- Temperature: 23°C ± 2°C.
- Humidity: 45% to 55% RH.
- Visual Check: Inspect the probe tip for scratches, debris, or “flat spots.” A worn probe tip is the leading cause of non-linearity in measurements.
Phase 2: Mastering the Zero-Point (Base Calibration)
The “Zero” is the foundation. We use an uncoated substrate (Zero Plate) that matches the material, shape, and thickness of the actual parts being measured.
- Clean the base plate thoroughly using isopropyl alcohol.
- Perform multiple “Zero” readings to ensure the gauge reads 0.0 µm consistently.
Phase 3: Multi-Point Verification (The Heart of Calibration)
Professional calibration requires a minimum of 3 to 5 points across the device’s functional range.
- Selection of Standards: Use certified calibration foils (shims) with known thicknesses (e.g., 25 µm, 100 µm, 500 µm, 1000 µm).
- Point Testing: Place the foil on the zero plate and take 5–10 readings per point.
- Linearity Check: Calculate the mean and standard deviation. The error at each point must fall within the manufacturer’s specified tolerance or the process requirements.
Phase 4: Calculating Uncertainty
Under ISO 17025, a calibration certificate is incomplete without a Statement of Uncertainty. This accounts for:
- Repeatability of the gauge.
- Resolution of the display.
- Uncertainty of the reference foils.
- Environmental fluctuations.
4. Digital vs. Analog: Specific Calibration Challenges
While modern digital coating thickness testers offer auto-calibration features, they are not a substitute for external laboratory calibration.
Digital testers often have internal software algorithms to compensate for temperature or substrate curvature. However, these algorithms can fail. An external coating thickness gauge calibration procedure verifies that the digital processing is actually reflecting physical reality.
5. FAQs
Q1: How often should I calibrate my coating thickness gauge? Answer: Generally, annually. However, if the gauge is used in harsh environments or dropped, immediate re-calibration is required. High-volume production lines may require quarterly checks.
Q2: Can I use any metal plate for zeroing? Answer: No. The magnetic properties (for F-probes) or conductivity (for N-probes) of the zero plate must match your actual production parts. Using a different alloy will result in significant errors.
Q3: What is the difference between “Adjustment” and “Calibration”? Answer: Adjustment is changing the gauge’s readings to match a standard (user-level). Calibration is the formal process of measuring the gauge’s performance against a standard and documenting the error (lab-level).
Q4: My gauge reads accurately on flat plates but fails on curved surfaces. Why? Answer: This is “edge effect” or “curvature effect.” You must calibrate using a zero plate with the same curvature as your part to negate these physical interference factors.
Q5: Is ISO 17025 necessary, or is ISO 9001 enough? Answer: ISO 9001 is a management standard; ISO 17025 is a technical competency standard. For legal traceability and high-precision industries, ISO 17025 is the gold standard.
Crucial Distinctions
Adjustment vs. Calibration
Adjustment: User-level process of changing gauge readings to match a standard.
Calibration: Lab-level formal process measuring performance against standard and documenting error.
ISO 17025 vs. ISO 9001
9001: Management standard.
17025: Technical competency standard for legal traceability in high-precision industries.
Digital Auto-Calibration Risk
Internal software algorithms compensate for temp/curvature but can fail. External lab calibration verifies the digital processing reflects physical reality.
Maintenance Pro-Tips
Maintain instrument integrity between annual calibrations.
Never drag the probe. Micro-abrasions on ruby/tungsten tips cause drift.
Finger oil adds 1–2 microns. Handle by edges, wipe with lint-free cloth.
Replace at 20%. Low voltage causes unstable signals in eddy current/magnetic fields.
Keep hard case away from industrial motors to prevent internal sensor bias.
6. Maintenance for Longevity
As a specialist with decades in the field, here are my top “Pro-Tips” for maintaining instrument integrity between official calibrations:
- Protect the Probe Tip: Never “drag” the probe across the surface. This causes micro-abrasions on the ruby or tungsten tip, leading to measurement drift. Always lift and place vertically.
- Clean the Shims: Oil from your fingers can add 1-2 microns to a calibration foil. Always handle shims by the edges or use gloves, and wipe them with a lint-free cloth.
- Battery Management: In digital testers, low voltage can affect the signal processing of the eddy current or magnetic field. Replace batteries at 20% remaining capacity to ensure signal stability.
- Storage: Store the gauge in its hard case, away from strong magnets (like large speakers or industrial motors) which can permanently bias the internal sensors.
Conclusion
A coating thickness gauge is more than a tool; it is a critical investment in your product’s survival. By adhering to a rigorous coating thickness gauge calibration procedure and utilizing an ISO 17025 coating thickness calibration service, you transform guesswork into certainty. Don’t let a few microns stand between you and professional excellence.
Contact our metrology experts today to schedule your ISO 17025 certified calibration and ensure your measurements are beyond reproach.
