Digital pressure gauges are rapidly replacing mechanical gauges across manufacturing, pharmaceutical production, HVAC systems, hydraulics, and oil & gas applications. Engineers and managers appreciate their accuracy, readability, and advanced functions such as logging, peak capture, and temperature compensation.
But as precise as they are, digital gauges still drift over time — and this makes regular digital pressure gauge calibration essential to ensure safety, compliance, and reliable decision-making.
In this guide, we explore how digital pressure gauges work, why they drift, how calibration is performed, and the standards required for accurate measurement.

What Makes Digital Pressure Gauges Different?
Compared to mechanical gauges, they offer several advantages:
-
Higher resolution and readability
-
Better digital pressure gauge accuracy over a wider range
-
Temperature compensation (reducing drift)
-
Data logging and min/max tracking
-
Optional communication outputs for SCADA, PLCs, and automated systems
However, despite their enhanced stability, digital gauges are still affected by temperature fluctuations, shock, vibration, electrical noise, and sensor aging. Over time, these factors gradually shift the measurement away from the true value — making pressure gauge calibration mandatory.
Digital pressure gauge calibration is a comprehensive process that verifies multiple critical performance parameters to ensure measurement accuracy and reliability across all operating conditions.
A complete calibration assessment examines zero offset, full-span accuracy, measurement linearity across the range, hysteresis between ascending and descending readings, repeatability under identical conditions, and stability under temperature variations.
Linearity
Hysteresis
Repeatability
Temperature Effects
Overrange Behavior
As Found (6-7/10)
As Left (9/10)
Before vs. After: The Impact of Adjustment
“As Found” values represent the gauge’s condition before calibration, often showing drift from specifications. “As Left” values reflect performance after adjustment, bringing all parameters back within tolerance limits.
Professional calibration typically reduces measurement error by 80-90%, ensuring compliance and operational reliability.
Why Digital Pressure Gauge Calibration Is Critical
Even a small deviation in pressure measurement can have significant consequences. A drift of just 1–2 psi may cause:
-
False alarms
-
Inaccurate process control
-
Batch failures in regulated industries
-
Increased wear on compressors or pumps
-
Safety hazards in high-pressure systems
-
Deviations from ISO, GMP, or FDA requirements
Digital pressure gauge calibration ensures readings remain within the manufacturer’s specified tolerance and meet industry standards. It also verifies that the instrument maintains stable performance across the entire pressure range — not only at a single point.
How Digital Pressure Gauges Drift Over Time
Drift is unavoidable due to several physical and environmental factors. The most common include:
-
Temperature effects: Sensor output shifts due to expansion and contraction.
-
Hysteresis: Increasing vs decreasing pressure produces slightly different readings.
-
Vibration and shock: Impact can change the zero point or damage sensor elements.
-
Electrical interference: EMI/RFI from motors or high-voltage equipment affects electronics.
-
Sensor fatigue: Constant loading affects sensitivity over months and years.
Understanding these sources of error helps technicians decide the proper calibration interval and investigate failures more accurately.
Reference Standards Used to Calibrate Digital Pressure Gauges
Professional calibration relies on highly accurate reference instruments with traceability to ISO/IEC 17025 or national metrology institutes.
Dead Weight Tester (DWT)
The gold standard for pressure verification.
It applies pressure through known masses and a precision piston-cylinder system, achieving extremely low uncertainty (±0.005% or better).
Digital Pressure Calibrators
Portable, field-friendly instruments such as Fluke, Additel, and Mensor calibrators.
They offer fast setup, automation, and pressure generation.
Pressure Sources & Accessories
-
Pneumatic or hydraulic hand pumps
-
High-pressure hoses
-
T-manifolds and precision fittings
-
Leak-free sealing elements
Choosing the right medium (air or oil) is essential to avoid damaging the gauge or introducing measurement errors.
Standard Calibration Procedure for Digital Pressure Gauges
The calibration process typically follows ISO/IEC 17025 or the manufacturer’s recommended procedure. While labs may vary in method, the essential steps remain consistent.
1) Preparation
The gauge is checked for damage, dirt, or low battery. After it warms up to room temperature, the technician moves the pressure up and down to let the sensor settle.
2) Setup
The digital pressure gauge is connected to a reference standard using proper fittings and sealing. For hydraulic systems, air bubbles must be removed to ensure stable readings.
3) Applying Test Points
Pressure is applied in ascending steps — 0%, 25%, 50%, 75%, 100% of full scale — and then repeated in descending order.
This dual-direction test checks hysteresis, repeatability, and linearity.
At each point, the technician records:
-
Reference pressure
-
Gauge reading
-
Error
-
Stabilization time
4) Adjustment
5) Documentation
A proper calibration certificate includes before/after data, environmental conditions, reference standards, measurement uncertainty, and a traceability statement.
How Often Should You Calibrate a Digital Pressure Gauge?
Calibration intervals depend on application, accuracy requirements, and usage environment.
Recommended intervals:
-
Every 12 months for standard industrial use
-
Every 6 months for demanding or variable environments
-
Every 3–6 months for critical applications (oil & gas, pharma, aerospace)
Immediate recalibration is required when:
-
The gauge has been dropped or exposed to shock
-
Readings appear inconsistent
-
It was used above its rated pressure
-
The environment experienced extreme temperature changes
Tracking usage and drift trends helps QA teams optimize calibration intervals and reduce downtime.
Common Errors That Affect Digital Pressure Gauge Accuracy
Technicians frequently encounter the same failure modes across industries:
-
Temperature fluctuations causing gradual drift
-
Contamination of the pressure port
-
Leaks from loose fittings
-
Sensor damage from overpressure
-
Incorrect pressure medium (oil instead of air)
-
Low battery voltage affecting electronics
-
Skipping the “exercise” step before measurement
Recognizing these issues helps identify whether the gauge needs repair, recalibration, or replacement.
Applications & Risks of Incorrect Pressure Measurement
Digital pressure gauges are used in almost every pressure-dependent process:
-
Manufacturing & automation: Incorrect pressure reduces quality and throughput.
-
HVAC/R systems: Wrong readings stress compressors or cause system shutdowns.
-
Pharmaceutical production: Precise pressure is essential for validated processes.
-
Oil & gas: Misreading can lead directly to safety incidents.
-
Food & beverage: Incorrect pressure affects pasteurization and product quality.
For example, a compressed air system may use a gauge that reads wrong. This wrong reading can cause a false alarm. When that happens, the line stops for hours. It is a costly problem that you can easily avoid.
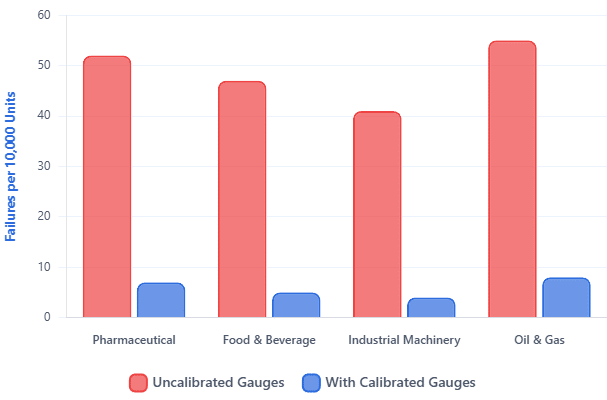
Production lines and critical processes using properly calibrated digital pressure gauges show dramatically lower failure rates than lines running with uncalibrated or overdue instruments.
Regular calibration is not just a compliance requirement—it’s a proven strategy to minimize defects, reduce recalls, and maintain operational excellence across industries.

*Numbers shown are illustrative based on industry averages. The trend demonstrates how regular calibration significantly reduces field failures, production defects, and costly product recalls.
FAQ: Digital Pressure Gauge Calibration
Can I calibrate a digital pressure gauge on-site?
Yes — portable calibrators can achieve suitable accuracy for field verification.
Is a Dead Weight Tester necessary?
Not always. DWTs are used for high-accuracy laboratory calibration, while digital calibrators are ideal for routine checks.
How do I know when to replace a gauge instead of recalibrating it?
If the sensor shows large hysteresis, repeated drift, or permanent deformation, replacement is often more cost-effective.
Does calibration need to be ISO 17025 compliant?
Industries with audits (pharma, aerospace, oil & gas) usually require ISO/IEC 17025 calibration for compliance.
Conclusion
Calibrating a digital pressure gauge is important for keeping pressure readings accurate, safe, and reliable. No matter where it is used—on a production line, in a cleanroom, in a hydraulic setup, or in an automated machine—the gauge needs regular checks to stay within spec. When engineers and QA teams know how these gauges work, why they drift, and how to calibrate them, they can build a stronger and more traceable pressure control system.


