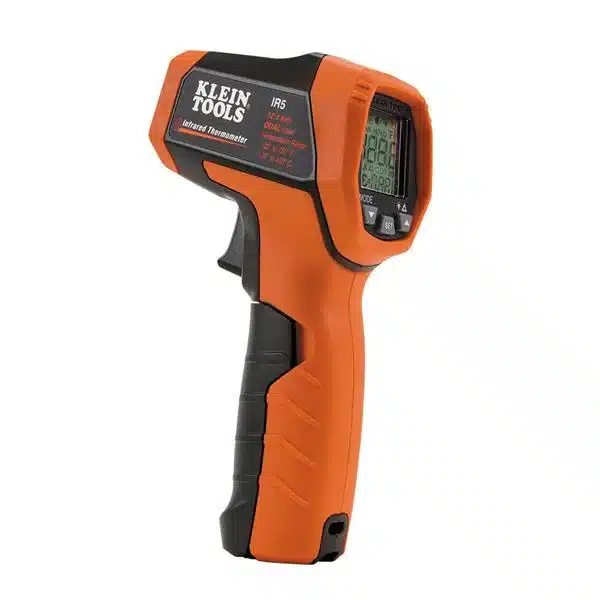
Dual-Laser Infrared Thermometer Calibration: The Ultimate Tool for Precision Measurement
In the era of Industry 4.0, measurement precision is the bedrock of all manufacturing and maintenance processes. Temperature control plays an incredibly critical role, from ensuring operational safety and maintaining product quality, to complying with stringent regulations. The Dual-Laser Infrared Thermometer has emerged as an advanced measuring solution. This device allows for remote, non-contact surface temperature determination with high accuracy and superior targeting capabilities. The distinctive feature of a dual-laser infrared thermometer is its ability to use two laser beams to precisely define the measurement area. This provides users with reliable results even on small, distant, or challenging targets. However, regardless of how advanced the technology, the reliability of any measuring device depends on regular Dual-Laser Infrared Thermometer Calibration. This is a mandatory procedure to ensure that all measurement results are accurate and traceable, thereby supporting timely and effective maintenance and quality decisions.
1. Dual-Laser Infrared Thermometer: Remote Measurement Technology

To truly appreciate the value of a dual-laser infrared thermometer, we need to understand its operating principle and the enhancements that dual-laser technology brings.
1.1. Basic Principles of Infrared Temperature Measurement
Every object with a temperature above absolute zero ( or ) emits infrared radiation. An infrared thermometer works by capturing and measuring the intensity of this radiation through a specialized lens. Subsequently, a thermopile sensor converts this infrared energy into an electrical signal, which a microprocessor then calculates and displays as the object’s surface temperature value.
- Advantages: Non-contact measurement, extremely fast response time, safe for measuring hazardous objects (molten metals, high voltage, moving parts).
- Limitations (for basic devices): Can be difficult to precisely define the measurement area (spot size), especially at long distances, leading to inadvertent measurement of surrounding objects.
1.2. The Superiority of Dual-Laser Technology
Superior Dual Laser Technology
SINGLE LASER (Ambiguous)
Only indicates the center point. Actual spot size undefined, leading to inaccurate measurement.
Actual spot size?
DUAL LASER (Precise)
Two converging laser points define exact measurement diameter, eliminating guesswork.
Accurate spot size
Detailed Spot Size Accuracy Comparison
Dual Laser ensures you only measure the true target, controlling the D:S Ratio (Distance-to-Spot Size).
D:S Ratio
50:1
At 50 inches distance → spot diameter = 1 inch.
Higher ratio = smaller, further measurement
Instant Targeting:
Two beams converge exactly at the measured spot for precision aiming.
Eliminates Area Error:
Avoids interference from surrounding radiation or surfaces.
Unlike single-laser infrared thermometers, which use one beam merely to indicate the center point, dual-laser infrared thermometers employ two parallel or converging laser beams.
- Precise Spot Size Definition: These two laser beams converge at a specific point on the target. The distance between the two laser dots on the object’s surface indicates the exact diameter of the measurement area (spot size). This eliminates guesswork, allowing the user to be certain of the exact area being measured, even when the target is small or distant.
- High Targeting Accuracy: Operators can confidently aim at small points or specific components on a large system without worrying about inadvertently measuring adjacent areas with different temperatures. This is a crucial factor in diagnosing hot spots on circuit boards or electrical connections.
2. Comparison: Dual-Laser Infrared Thermometers vs. Other Temperature Measurement Methods
Understanding the advantages and disadvantages compared to other technologies helps optimize device selection.
Measurement Method Comparison
| Characteristic | IR (Dual Laser) | IR (Single Laser) | Contact (Thermocouple) |
|---|---|---|---|
| Speed | Milliseconds | Milliseconds | Seconds–Minutes |
| Safety | Non-contact (Safe) | Non-contact (Safe) | Risk (Hot/Live) |
| Spot Size Definition | Accurate (2 beams) | Approximate | N/A |
| Measurement Type | Surface | Surface | Internal |
| Influenced by | Emissivity | Emissivity | Surface finish (less) |
2.1. Comparison with Single-Laser Infrared Thermometers
- Dual-Laser: Precisely defines the size of the measurement area (spot size). Minimizes errors due to incorrect aiming, increasing reliability. Ideal for small or distant targets.
- Single-Laser: Only indicates the center point. Does not provide information about the size of the measurement area. Easier to inadvertently measure surrounding areas, especially at greater distances.
2.2. Comparison with Contact Temperature Sensors (Thermocouples, RTDs)
- Advantages of Infrared: Non-contact measurement, extremely fast response, safe for operators (no need to touch hot or live electrical components). Does not alter the temperature of the object being measured.
- Disadvantages of Infrared: Only measures surface temperature (not internal). Results are affected by the emissivity of the surface material and environmental factors (dust, moisture).
- Advantages of Contact: Measures internal temperature, higher accuracy for the true object temperature. Less affected by surface emissivity.
- Disadvantages of Contact: Requires physical contact, slower response, unsafe for high-temperature/high-voltage/moving parts applications. Can damage surfaces or alter object temperature.
3. Diverse Applications of Dual-Laser Infrared Thermometers
Thanks to precise targeting and non-contact measurement, this device is an indispensable diagnostic tool:
Diverse Industry Applications
Electrical & Mechanical MRO
Detecting hotspots on panels, motors, and bearings to prevent failures.
Food Safety (HACCP)
Non-contact temperature checks to prevent contamination.
Construction & Energy
Identify thermal leaks and insulation defects efficiently.
3.1. Industrial Maintenance, Repair, and Operations (MRO)
- Electrical Systems: It measures the temperature of distribution panels, transformers, motors, and electrical connections. The goal is to detect hot spots caused by loose connections, overloading, or early failures.
- Mechanical Equipment: Checks the temperature of operating bearings, pumps, gearboxes, and fans. Elevated temperatures indicate friction, lack of lubrication, or misalignment, helping prevent major equipment breakdowns.
- HVAC/R Systems: Measures the temperature of ducts, coils, compressors, and condensers. It assesses cooling/heating performance and detects leaks or blockages.
- Furnaces, Boilers: Measures the external temperature of furnaces, boilers, and steam pipes to control heat loss. This optimizes energy efficiency.
3.2. Food Industry and Hygiene Safety
- Cold Chain Control: Rapidly measures the surface temperature of frozen, chilled food, or goods during transport and storage. Non-contact measurement is key to complying with HACCP regulations and avoiding cross-contamination.
- Equipment Temperature Checks: Verifies the internal temperature of industrial refrigerators, ovens, fryers, or sterilization equipment to ensure precise and safe operating temperatures.
3.3. Construction and Energy Auditing
- Detecting Heat Loss/Poor Insulation: It identifies unusually cold or hot spots on walls, roofs, and windows. This helps energy auditors quickly pinpoint heat leaks.
- Detecting Moisture Issues: Abnormal cold spots can indicate condensation or high humidity, helping prevent mold growth.
3.4. Automotive Industry
- System Diagnostics: Measures the temperature of brake discs, pads, tires, engines, and cooling systems to identify issues such as seized brakes, engine overheating, or over/under-inflated tires.
4. The Crucial Role of Dual-Laser Infrared Thermometer Calibration
Despite advanced dual-laser features, the accuracy of measurement results still depends on sensor quality and device reliability. Calibration is the key factor in maintaining that accuracy.
The Vital Role of Calibration
An inaccurate device is worse than no device. Calibration ensures the data you trust is the truth.
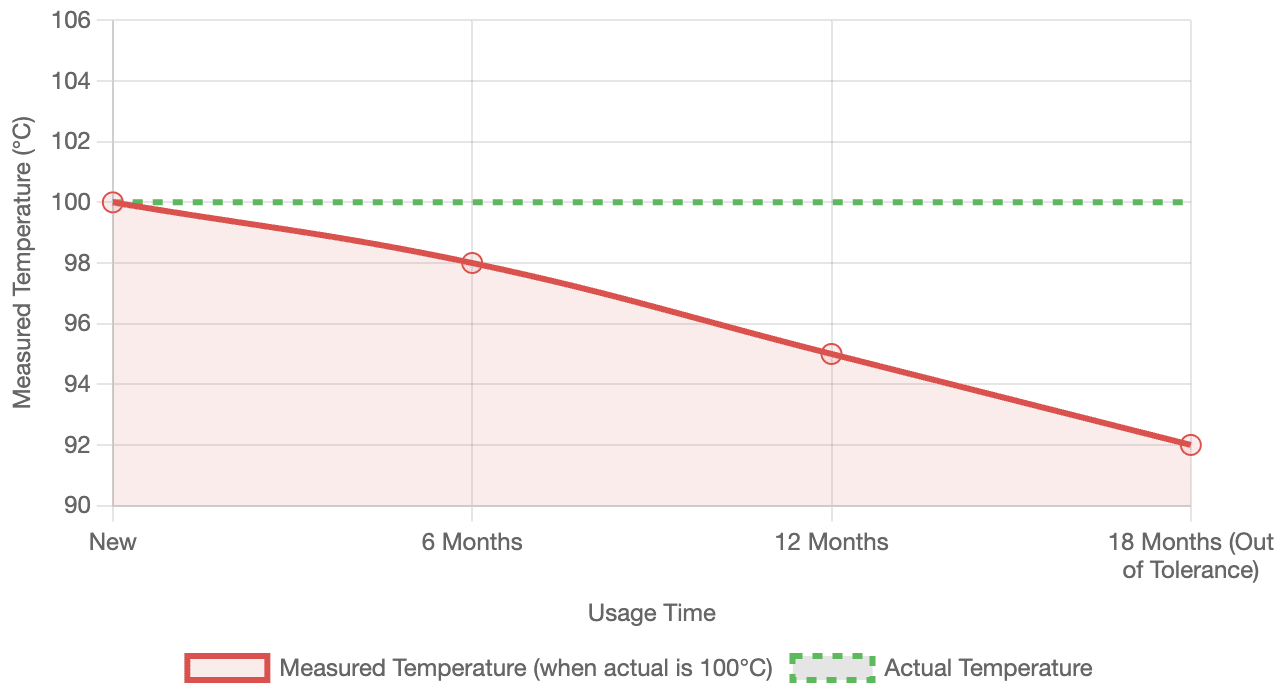
Sensor Drift Over Time
Sensor performance naturally degrades, causing measurements to drift ( e.g., read lower than actual) after 12 months.

Impact of Inaccuracy
A faulty unit reads 70°C (safe), while actual is 90°C (fire risk).

4.1. Ensuring Absolute Accuracy
- Fundamental Principle: Infrared thermometers must be calibrated using reference standards (such as a Blackbody Radiator) across various temperature ranges. This ensures that the displayed temperature value matches the actual value of the reference standard.
- Avoiding Costly Errors: Small errors in temperature measurement can lead to critical decisions with severe consequences. For example, overlooking a 5-degree hotspot on electrical equipment could result in a fire.
4.2. Compliance with Standards and Traceability Requirements
- Traceability Certificate: Regular calibration provides a Traceability Certificate. This document is essential evidence in quality audits (ISO 9001, HACCP, cGMP).
- Emissivity Verification: The emissivity of a material significantly affects infrared measurement results. During the calibration process, these parameters are checked and verified.
4.3. Calibration Frequency and Performance Maintenance
- Recommended Frequency: Most manufacturers and regulations require calibration at least every 12 months (annually).
- Abnormal Recalibration: The device should be recalibrated immediately if it has been dropped, subjected to significant impact, shows signs of unstable operation, or after major repairs. This ensures optimal measurement performance is always maintained.
Conclusion
The Dual-Laser Infrared Thermometer is a powerful diagnostic tool. It enhances safety, optimizes performance, and protects assets across numerous industries. However, to fully leverage its accuracy and reliability, regular Dual-Laser Infrared Thermometer Calibration is a mandatory investment. This ensures all your maintenance and quality decisions are based on reliable and traceable data, contributing to sustained safety and success.


