Digital Panel Meter Calibration and Digital Panel Indicator Calibration play a critical role in maintaining the accuracy and reliability of electrical measurement systems in modern industrial environments. Digital panel meters and indicators are commonly installed in control panels and power distribution boards to continuously display key parameters such as voltage, current, power, and energy consumption.
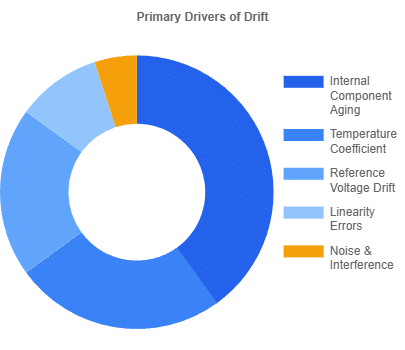
Over time, factors such as component aging, environmental conditions, and continuous operation can cause measurement drift, leading to inaccurate readings and potential risks to process control and energy management. Regular calibration ensures that digital panel meters and indicators continue to operate within specified tolerances, support stable system performance, and comply with quality management and regulatory requirements.
1. What Is a Digital Panel Meter?
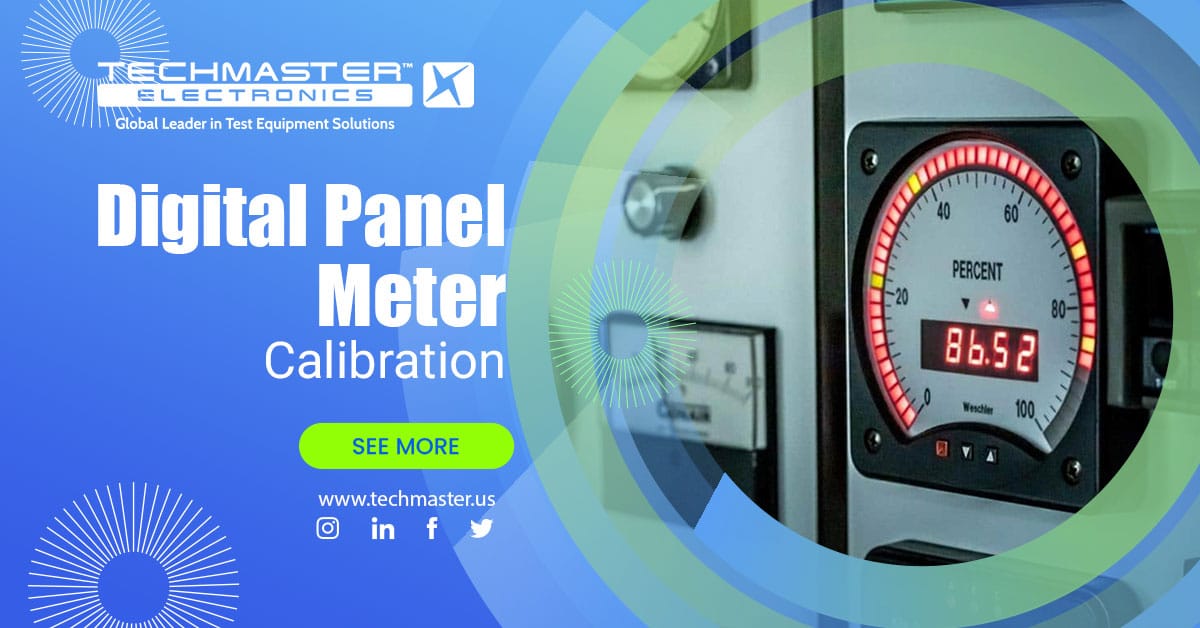
A digital panel meter (DPM) is an electronic measuring instrument installed on electrical panels to display key electrical parameters such as voltage (V), current (A), power (kW), frequency (Hz), or energy consumption (kWh).
Digital panel meters are widely used in:
-
Electrical control panels
-
Industrial automation systems
-
Power distribution boards
-
Manufacturing and process industries
Due to their continuous operation and direct impact on system monitoring, digital panel meters require periodic calibration to maintain measurement accuracy.
What is Digital Panel Meter Calibration?
In the industrial world, a digital panel meter (DPM) is the trusted interface between raw electrical signals and human decision-making. Calibration is the process of comparing this device against a known standard of higher accuracy (traceable to NIST) to detect and correct deviations. It is not just “checking” the meter; it is the act of quantifying uncertainty and adjusting for drift.
Comparison
Testing against a master standard.
Adjustment
Zero and Span corrections.
Traceability
Unbroken chain to NIST standards.
The “Drift” Phenomenon
Electronic components age. Capacitors dry out, resistors shift value due to thermal cycling, and reference voltages drift. Without intervention, a meter that was 100% accurate on Day 1 can drift significantly by Day 365, leading to false readings that compromise safety and quality.
Did you know?
Typical industrial DPMs can drift 0.1% to 0.5% per year without recalibration.
Accuracy Degradation Over 5 Years
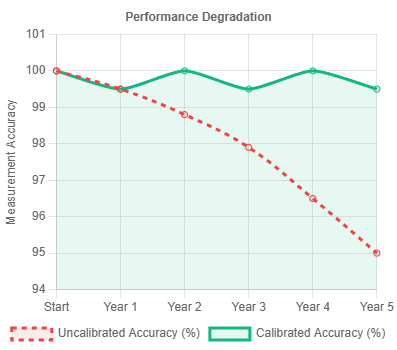
Figure 1: Comparison of unmaintained vs. annually calibrated instruments.
2. Why Digital Panel Meter Calibration Is Important
2.1 Ensuring Measurement Accuracy
Over time, electronic components inside a digital panel meter may drift, causing displayed values to deviate from actual measurements. Calibration helps restore accuracy and ensure reliable readings.
2.2 Supporting Process Control & Decision Making
In industrial environments, digital panel meters often provide input data for:
-
PLC systems
-
SCADA monitoring
-
Energy management platforms
Incorrect measurements can lead to poor operational decisions, energy inefficiency, or process instability.
2.3 Compliance With Quality and Safety Standards
Many quality systems and audits require calibrated measuring instruments. Digital panel meter calibration supports compliance with:
-
ISO 9001 quality management systems
-
ISO/IEC 17025 measurement traceability requirements
-
Internal quality and safety procedures
3. Digital Panel Meter Calibration in Industry 4.0 & AI
While traditional calibration focused mainly on manual adjustment, modern industrial trends are reshaping how calibration data is used.
3.1 Smart Metering & System Integration
Today’s digital panel meters increasingly support:
-
Multi-parameter measurement (V, A, kW, kWh, PF)
-
Communication protocols such as Modbus RTU/TCP
-
Integration with SCADA and automation systems
This means calibration accuracy directly affects system-wide data quality, not just local display values.
3.2 Calibration Data & Predictive Maintenance
In Industry 4.0 environments, historical calibration results are often analyzed to:
-
Detect long-term drift trends
-
Predict future out-of-tolerance conditions
-
Optimize maintenance and calibration schedules
This enables predictive maintenance, reducing unplanned downtime and improving system reliability.
4. Pre-Calibration Preparation (Professional Best Practice)
Before starting calibration, proper preparation is essential to ensure valid and repeatable results.
4.1 Warm-Up Time
Electronic components require time to stabilize after power-on.
-
Recommended warm-up time: 15–30 minutes
-
Both the digital panel meter and reference standard should be powered on
This minimizes thermal-related measurement errors.
4.2 Environmental Conditions
Calibration should be performed under controlled conditions:
-
Temperature: 23°C ± 2°C
-
Relative humidity: below 80% RH
-
Avoid vibration, strong airflow, or nearby high-power equipment
Stable environmental conditions improve measurement consistency.
4.3 Test Uncertainty Ratio (TUR)
A key requirement in professional calibration is the Test Uncertainty Ratio (TUR).
-
Commonly applied rule: 4:1
-
The reference standard must be at least four times more accurate than the device under test
This ensures confidence in the calibration results and supports audit requirements.
Visualizing Calibration Errors
Calibration addresses two primary types of linear errors: Offset (Zero shift) and Gain (Span error).
Offset Error (Zero Shift)
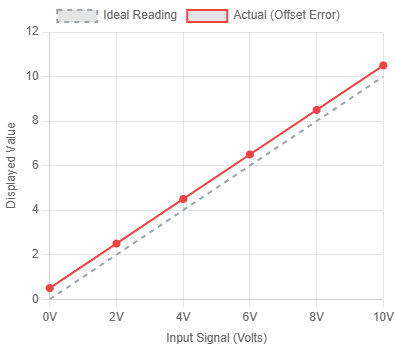
The entire reading is shifted up or down by a constant amount.
Gain Error (Span Shift)
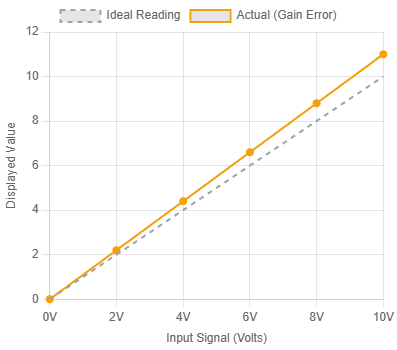
The error increases proportionally as the input signal increases.
The Calibration Workflow
A standard calibration procedure ensures consistency and traceability. This flowchart outlines the typical steps taken by a calibration technician.
Visual Inspection
Check for damage, loose terminals, or display issues.
As-Found Data
Record current readings against standard before any adjustment.
Adjustment
Adjust Zero (low end) and Span (high end) potentiometers.
As-Left Data
Verify accuracy after adjustment and issue certificate.
The Cost of Ignorance
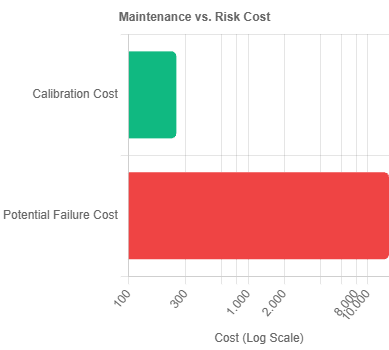
Many facility managers skip calibration to save budget. This is a false economy. The cost of a single product recall, a safety violation fine, or downtime due to equipment burnout far exceeds the modest cost of annual calibration.
Cost Comparison (Annual)
6. Factors Affecting Digital Panel Meter Accuracy
Several factors contribute to measurement drift over time.
6.1 Component Aging
Internal electronic components gradually change value due to thermal stress and long-term operation, leading to drift.
6.2 Electromagnetic Interference (EMI)
Installation near variable frequency drives, transformers, or high-current equipment can introduce electrical noise.
6.3 Mechanical and Thermal Stress
Vibration and repeated temperature changes may affect internal connections and circuit stability.
7. Calibration Documentation & Traceability
7.1 Traceability to Measurement Standards
Calibration results should be traceable to national or international standards through:
-
Accredited reference instruments
-
ISO/IEC 17025 calibrated standards
-
National metrology institutes such as NIST or equivalent
Traceability ensures credibility during audits and inspections.
7.2 Calibration Interval Recommendation
Calibration frequency should be determined based on:
-
Usage intensity
-
Criticality of the measurement
-
Environmental conditions
-
Historical drift data
While annual calibration is common, critical instruments may require shorter intervals.
8. Conclusion
Digital panel meter calibration remains a fundamental requirement in industrial measurement systems. In modern Industry 4.0 environments, its role extends beyond accuracy correction to supporting data integrity, predictive maintenance, and system-wide reliability.
By combining standardized calibration procedures with proper documentation and traceability, organizations can ensure long-term performance and compliance of their digital panel meters.


