


Every electrical technician knows the “Golden Rule” of safety: Test Before Touch.
You rely on your digital multimeter (DMM) to tell you if a circuit is de-energized. But here is the uncomfortable question that often gets overlooked in safety meetings: You trust your meter, but who is checking the device that checks your meter?
This is where the Proving Unit comes into play. It is the “verifier of the verifier.”
However, a proving unit is an electronic device, subject to component drift, battery issues, and environmental stress. If it isn’t accurate, your entire safety protocol collapses. In this guide, we will move beyond basic usage and deep dive into Proving Unit Calibration—explaining why it is not just a “nice-to-have” paperwork exercise, but a critical requirement for NFPA 70E compliance and life safety.

The Drift Factor: Why Calibration is Non-Negotiable
Even the best electronic devices, such as the Fluke PRV240FS Proving Unit, are subject to Component Drift. Over time, heat, humidity, and aging cause internal resistors and capacitors to degrade, silently shifting your output voltage.
The Danger of “False Negatives”
If your Test Voltage Indicator Calibration is outdated, the unit may output a voltage lower than the manufacturer’s spec. This leads to a False Negative:
-
You assume your tester is broken because it won’t light up.
-
In reality, the Proving Unit is failing to provide a sufficient reference.
Critical Safety Risks:
-
Arc Flash Hazard: Working on live equipment due to a faulty “Live-Dead-Live” test.
-
Compliance Failure: Violating NFPA 70E and OSHA safety mandates.
-
Accuracy Loss: Uncalibrated units can drift up to 20% over 5 years, falling outside safe operating thresholds.
The Bottom Line: Annual Proving Unit Calibration is the only way to counteract electronic drift and ensure your “source of truth” remains accurate.
Why Calibrate? The Drift Factor
Electronic components (capacitors, resistors) degrade over time due to heat, humidity, and aging. A unit designed to output 240V may drift significantly.
If the output drops below the sensitivity threshold of your Voltage Indicator, you might get a “False Negative”—believing your tester is broken when it’s actually the proving unit that failed.
- ⚠️ Risk of Arc Flash
- ⚠️ Legal Non-Compliance
- ⚠️ Compromised Safety Barrier
Simulated Voltage Output Over 5 Years (Uncalibrated)
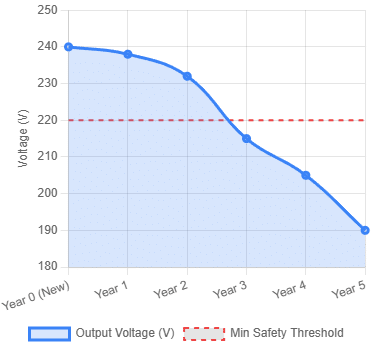
Data represents typical electronic component drift without maintenance.
Beyond the Battery: Why Proving Units Fail
If you think a fresh battery guarantees safety, think again. While power issues are common, the most dangerous failures in Proving Unit Calibration are often invisible to the naked eye.
Common Failure Modes
Even rugged devices like the Fluke PRV240FS Proving Unit face significant wear and tear in the field:
-
Physical Impact: Hidden internal cracks from being tossed in tool bags can lead to intermittent voltage output.
-
Internal Corrosion: Industrial contaminants and humidity degrade contact points, increasing resistance.
-
Battery Leakage: The leading cause of hardware destruction. Leaked acid can eat through circuit boards, causing the unit to fail during a critical “Live-Dead-Live” test.
Why “Lab Testing” is Essential
A simple light-up test won’t detect internal corrosion or high-impedance faults. Professional Test Voltage Indicator Calibration ensures that every component—not just the battery—is performing to OEM specifications.
💡 Maintenance Tip: To prevent the #1 cause of failure, always remove batteries before long-term storage and schedule an annual calibration to verify internal integrity.
Primary Causes of Proving Unit Failure
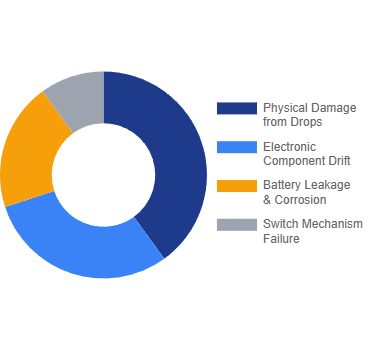
It’s Not Just Batteries
While a dead battery is a common annoyance, true safety failures come from physical damage and internal corrosion.
Proving units like the Fluke PRV240FS are often tossed into tool bags, subjected to drops,
and used in harsh industrial environments.
Did you know?
Battery leakage is the #1 killer of proving units stored for long periods. Always remove batteries if the unit is not in daily use.
The Critical Distinction: Functional Check vs. Calibration
One of the most common misconceptions in the industry is confusing a daily “field check” with a formal calibration. To establish a robust electrical safety program, you must understand the difference.
1. Functional Check (Field Verification)
A functional check is what you do in the field, often dozens of times a week. You use your Proving Unit to verify that your multimeter is working before and after measuring a circuit.
-
Goal: To confirm the meter is functional and the battery isn’t dead.
-
Result: Pass/Fail. (Does the light come on? Yes/No).
-
Traceability: None.
2. Test Voltage Indicator Calibration (Lab Calibration)
This is a formal procedure performed by an accredited metrology laboratory.
-
Goal: To verify that the Proving Unit is generating the exact voltage it claims to generate (e.g., Is 240V actually 240V, or has it drifted to 200V?).
-
Result: Quantitative Data with acceptable tolerances.
-
Traceability: Linked to NIST (National Institute of Standards and Technology) or international standards.
Pro Tip: Think of it this way: The functional check tests the meter. The calibration tests the proving unit.
Quick Comparison: Field Check vs. Calibration
| Feature | Functional Check | Proving Unit Calibration |
| Performed By | Technician / End User | Metrology Lab Technician |
| Location | On-site / Field | Controlled Environment (Lab) |
| Frequency | Before & After every use | Annually (typically) |
| Standard | Manufacturer Instructions | NIST / ISO 17025 |
| Output | “It works” confirmation | Calibration Certificate |
Inside the Lab: Our 4-Step Proving Unit Calibration Protocol
When you send a Proving Unit to a professional metrology lab, it undergoes a rigorous verification process. This protocol ensures your safety tools, like the Fluke PRV240FS, meet the strict requirements of National Standards (NIST/UKAS).
1. Physical & Mechanical Inspection
We start by verifying the unit’s physical integrity. Cracked casings or corroded terminals aren’t just cosmetic issues—they are safety hazards that can lead to electrical leakage or device failure.
2. Precision Voltage Verification
Our technicians measure the actual AC and DC output using laboratory-grade multimeters with significantly higher accuracy than standard field tools. This identifies even the slightest Component Drift.
3. Real-World Load Testing
Many older voltage indicators draw significant current (Low Impedance). We simulate these “heavy loads” to ensure your Proving Unit doesn’t suffer a voltage collapse when you need it most.
4. Traceable Certification
The final step is the issuance of a Calibration Certificate. This document provides legal and technical proof that your Test Voltage Indicator Calibration is traceable to national standards, fulfilling your compliance obligations for NFPA 70E or ISO audits.
The Calibration Protocol
A look inside the lab: How we ensure your device is accurate to National Standards (NIST/UKAS).
Physical Inspection
Checking for cracked casings, damaged tips, and corroded battery terminals.
Voltage Verification
Measuring AC and DC output against high-precision laboratory multimeters.
Load Testing
Ensuring the unit maintains voltage even when driving older, heavy-load testers.
Certification
Issuing a traceable certificate linking the serial number to national standards.
Timing Your Calibration: Standard vs. Critical Intervals
How often should you perform Proving Unit Calibration? While the industry standard is 12 months, your specific work environment is the ultimate decider.
Defining Your Calibration Schedule
Electronic drift and physical wear occur at different rates depending on usage and storage. To maintain NFPA 70E compliance, consider these two primary tracks:
-
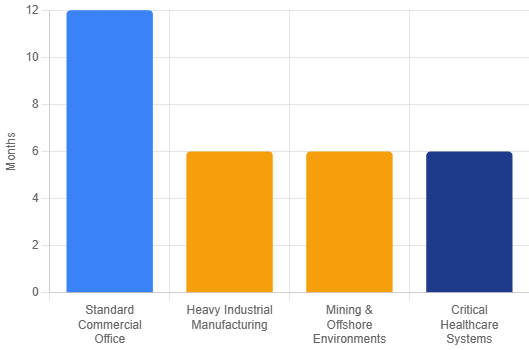
12-Month Interval (Standard): Ideal for units like the Fluke PRV240FS used in climate-controlled facilities, clean industrial plants, or for intermittent field use.
-
6-Month Interval (Critical): Recommended for harsh environments—such as marine, mining, or high-humidity zones—and for mission-critical safety programs where the “cost of failure” is unacceptably high.
Risk-Based Frequency
The bar chart illustrates that as environmental stress increases, the reliability of an unverified Proving Unit decreases. By tightening your Test Voltage Indicator Calibration schedule, you eliminate the “drift window” where safety could be compromised.
Key Rule: If your unit is subjected to a significant drop, moisture ingress, or extreme thermal shock, it should be recalibrated immediately, regardless of its previous service date.
When to Calibrate?
While annual calibration is the standard, your environment dictates your schedule. High-risk zones require tighter controls.
Standard Industry Recommendation
Harsh or Critical Environments
Recommended Calibration Intervals by Environment
Understanding Traceability (NIST)
When you receive your equipment back, you will get a Calibration Certificate. This document is your legal shield.
To be valid, the calibration must be NIST Traceable. This means there is an unbroken chain of documentation linking your Proving Unit’s measurements back to the master standards maintained by the National Institute of Standards and Technology (in the USA) or equivalent national bodies.
What to look for on your Certificate:
-
As Found Data: How the unit performed when it arrived at the lab (did it pass or fail before adjustment?).
-
As Left Data: How the unit performed after adjustment or verification.
-
Uncertainty of Measurement: The margin of error of the lab’s equipment.
Conclusion: Don’t Compromise on Safety
Safety is a binary state: You are either safe, or you are at risk. There is no middle ground.
The Proving Unit is the anchor of your electrical safety program. It is the device that tells your technicians, “Yes, your meter is telling the truth.” Leaving such a critical device unverified is a gamble you cannot afford to take.
By incorporating regular Proving Unit Calibration into your asset management strategy, you are not just ticking a compliance box for NFPA 70E. You are ensuring that when your team steps up to a panel to perform a Live-Dead-Live test, the equipment they trust with their lives is telling them the whole truth.
Is your safety equipment due for a check-up?
Don’t wait for an audit—or worse, an accident—to find out your equipment has drifted. Check the stickers on your Proving Units today.
