
Ultrasonic Flaw Detector FAQ: Calibration Intervals, Accuracy & Compliance
In Non-Destructive Testing (NDT), accurate instruments play an important role in checking material quality. QA managers, field engineers, and metrology teams often ask how often an ultrasonic flaw detector should be calibrated. Regular calibration helps maintain accurate flaw detection and reliable test results. Over time, however, heat, long operating hours, and normal component aging can affect the internal electronics. For example, changes in the pulser, receiver, and timing circuits may affect depth and signal readings. Therefore, a regular calibration plan helps reduce measurement errors and supports quality and compliance requirements.
Ultrasonic flaw detector calibration is not on Techmaster’s ANAB ISO/IEC 17025 scope (certificate AC-1736). We calibrate ultrasonic flaw detectors with NIST-traceable reference standards and issue a NIST-traceable certificate. See what is on our accredited scope.
1. How often should you calibrate an ultrasonic flaw detector?
For most industrial applications, an annual 12-month calibration interval provides a practical starting point. However, the best interval depends on the instrument, operating conditions, and inspection risk. For example, equipment used in harsh field conditions may need more frequent calibration. Likewise, instruments used for critical aerospace inspections may require a 6-month calibration cycle. Therefore, companies should consider the manufacturer’s recommendations, equipment usage, operating environment, and previous calibration results when setting the interval.
Why does electronic drift occur over time?
Out-of-Tolerance Electronic Drift Risk
Uncalibrated failure risk over operating months
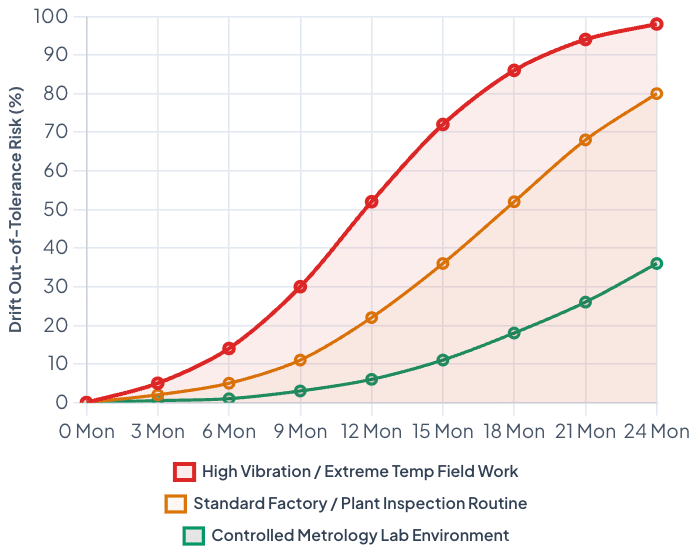
Although operators can adjust some settings during field inspections, internal electronic parts still change over time. Thermal cycles, component aging, vibration, and long operating hours can gradually affect the instrument.
As a result, several key areas may lose accuracy:
- Master Reference Oscillators: Timing changes can affect sound travel time and lead to incorrect depth readings.
- Analog-to-Digital Converters (ADCs): Changes in signal conversion can reduce the accuracy of the A-scan display.
- Receiver Amplifiers: Gain changes can affect echo height and make flaw signals appear stronger or weaker than they should.
Therefore, professional calibration helps identify these changes before they affect inspection results.
2. Determining Your Calibration Schedule: Key Factors and Risks
2.1. What factors determine calibration frequency?
There is no single calibration interval that works for every ultrasonic flaw detector. Instead, companies should review several key factors.
- Operating Environment: First, consider where the instrument operates. Portable units used outdoors may face heat, cold, dust, moisture, and physical shock. These conditions can increase wear on electronic parts.
- Duty Cycle and Usage: Next, check how often the equipment runs. An instrument used every day on a production line may need more frequent calibration than a unit used only a few times each month.
- Industry Requirements: In addition, some industries have strict quality and inspection rules. Aerospace, defense, and nuclear applications may require shorter calibration intervals.
- Previous Calibration Results: Finally, review past calibration data. If the instrument shows stable results over several cycles, your quality team may use that data when reviewing the next interval.
2.2. What are the risks of delayed calibration?
Delaying calibration can reduce confidence in ultrasonic inspection results. For example, gain drift may reduce the height of a crack signal on the screen. As a result, an operator may miss a flaw that should trigger further inspection. On the other hand, excessive gain can create signals that look like real defects. This situation may cause operators to reject good parts.
Therefore, delayed calibration can lead to:
- Missed material defects
- False inspection results
- Unnecessary part rejection
- Repeated testing
- Production delays
- Audit findings
- Higher inspection costs
For critical parts, these risks can have a much greater impact. Consequently, companies should treat calibration as part of their overall quality program.
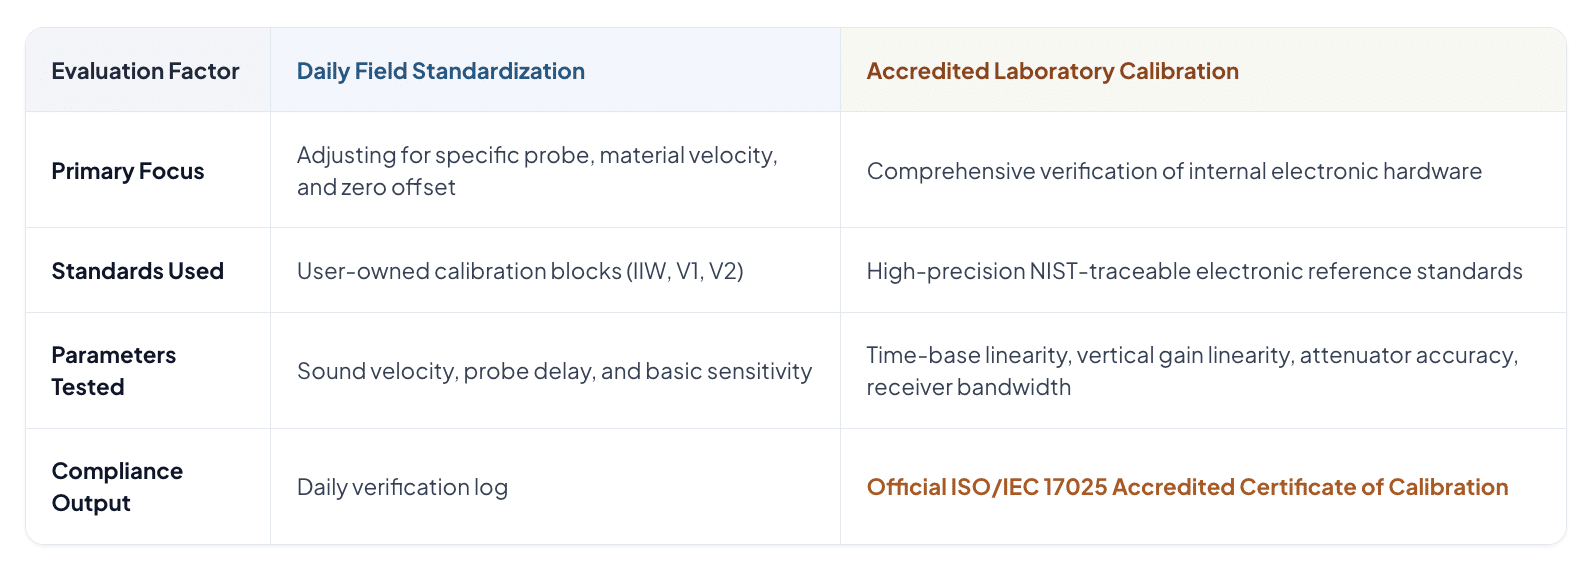
2.3. Field Standardization vs. Accredited Laboratory Calibration
Field Standardization vs. Accredited Laboratory Calibration
Understanding the operational boundary between daily operator setups and certified ISO/IEC 17025 laboratory calibration
3. How to Verify Ultrasonic Flaw Detector Performance Before Field Testing
Before starting an inspection, technicians should complete several basic checks. These steps help confirm that the instrument, probe, and reference block work correctly together.
Step 1: Allow the Instrument to Warm Up
First, turn on the ultrasonic flaw detector and allow it to warm up for about 15 to 30 minutes.
This short warm-up gives the internal electronics time to reach a stable condition. As a result, the instrument can provide more consistent readings during the test.
Step 2: Check the Probe and Cable
Next, inspect the transducer face and cable connections.
Look for cracks, wear, dirt, or loose connectors. Also, check the cable for damage or signs of poor contact.
A damaged probe or cable can add noise to the signal. Therefore, this simple inspection can prevent many avoidable test problems.
Step 3: Perform Two-Point Velocity Calibration
Then, place the probe on a certified reference block and apply the correct acoustic couplant.
Adjust the sound velocity and probe delay until two known thickness points match the correct positions on the A-scan.
This step is important because different materials have different sound speeds. Therefore, using the wrong velocity can cause incorrect depth readings.
Step 4: Check Vertical Gain Linearity
After that, test the receiver gain using a known reflector.
Adjust the gain in 6 dB steps and check the echo height on the screen. The signal should change in a predictable way as you increase or decrease the gain.
This check helps confirm that the receiver responds correctly across its working range.
Step 5: Check Alarm Levels
Finally, scan a certified reference block with known artificial flaws, such as side-drilled holes or EDM notches.
Check whether the selected alarm levels respond correctly when the probe passes over the known reflectors.
As a result, technicians can confirm that the instrument is ready before testing actual components.
Techmaster US: Your Accredited Metrology Partner
Techmaster Electronics, LLC is an ISO/IEC 17025 accredited calibration laboratory with ANAB certificate AC-1736. Founded in 1989, the company provides calibration services for a wide range of electrical, dimensional, and NDT equipment. In addition, Techmaster US provides both laboratory and on-site calibration support. This approach helps customers reduce equipment downtime while maintaining measurement accuracy. Techmaster teams use traceable reference standards to check equipment performance. Furthermore, on-site service can help reduce shipping time and keep critical inspection equipment available for production.
Why Choose Techmaster US?
- Accredited laboratory: Techmaster is accredited to ISO/IEC 17025 by ANAB (AC-1736); ultrasonic flaw detector calibration itself is NIST-traceable and not on that scope.
- NIST Traceability: Calibration uses traceable standards to support reliable measurement results and quality records.
- On-Site Calibration: Field technicians can perform suitable calibration work at the customer’s facility, helping reduce downtime.
- NDT Equipment Support: Techmaster provides calibration support for equipment used in inspection and measurement applications.
- Multiple Laboratory Locations: Techmaster operates accredited laboratories in Vista, Santa Clara, Orlando and San Antonio, plus a lab in Holly Springs.
Therefore, customers can access professional calibration support while maintaining their inspection and quality programs.
Frequently Asked Questions (FAQs)
1. How often should you calibrate an ultrasonic flaw detector?
An ultrasonic flaw detector should be calibrated every 12 months under standard industrial operating conditions to maintain NIST traceability. However, instruments used in harsh field environments or high-stakes aerospace applications require a 6-month calibration cycle to mitigate electronic drift.
2. What causes electronic drift in ultrasonic flaw detectors?
Electronic drift is caused by the physical degradation of internal reference oscillators, operational amplifiers, and analog-to-digital converters due to thermal stress, component aging, and continuous electrical loads. This drift subtly alters timing references and receiver gain accuracy over time.
3. What is the difference between velocity calibration and accredited laboratory calibration?
Velocity calibration is a routine user setup that adjusts the instrument’s screen range to match a specific material’s sound speed using reference blocks. Accredited laboratory calibration thoroughly evaluates the internal electronic hardware—such as time-base linearity, amplifier gain precision, and attenuator accuracy—against NIST standards.
4. Why is vertical gain linearity critical for NDT inspections?
Vertical gain linearity ensures that changes in screen echo height correspond proportionally to actual differences in reflector size. If gain response becomes non-linear due to electronic drift, operators can miscalculate flaw severity, leading to dangerous false-pass or false-fail assessments.
5. What proof of calibration is required for ASNT and ISO audits?
Auditors require an official ISO/IEC 17025 Certificate of Calibration featuring an accredited body symbol (such as ANAB), explicit NIST-traceable reference standards, documented measurement uncertainty values, and clearly recorded “As-Found” and “As-Left” test data.
6. Can Techmaster US perform on-site calibration for ultrasonic flaw detectors?
Yes, Techmaster Electronics offers on-site calibration with NIST-traceable reference standards. Flaw detector calibration is not on our ANAB ISO/IEC 17025 scope. Mobile metrology teams deploy high-accuracy electronic calibration standards directly to your plant or laboratory, verifying your equipment while eliminating shipping delays and operational downtime.
Conclusion
Regular ultrasonic flaw detector calibration plays an important role in reliable NDT inspection. First, technicians should perform basic checks before each inspection. Next, they should verify sound velocity, probe delay, gain, and alarm settings with a suitable reference block. However, field standardization alone cannot replace professional calibration. Regular accredited calibration checks the instrument’s internal performance and provides documented measurement results. Therefore, companies should set calibration intervals based on manufacturer guidance, equipment use, operating conditions, inspection risk, and historical calibration data. With the right calibration program, organizations can improve measurement confidence, support audit readiness, and reduce the risk of missed flaws or unnecessary part rejection.
Ultrasonic Flaw Detector FAQ: Calibration Intervals, Accuracy & Compliance
In Non-Destructive Testing (NDT), evaluating material integrity requires precise acoustic instrumentation. Learn how often to calibrate ultrasonic flaw detectors, mitigate electronic hardware drift, align with ISO/IEC 17025 standards, and verify performance prior to field testing.
CONTACT USReferences & industry standards
- ISO/IEC 17025 testing & calibration laboratory requirements
- NIST calibration services and measurement traceability
- A2LA / ANAB accreditation for calibration laboratories
External standards bodies. Techmaster Electronics is an ISO/IEC 17025-accredited, NIST-traceable calibration laboratory.
Frequently asked questions
What is ultrasonic flaw detector calibration?
Ultrasonic Flaw Detector Calibration is the documented comparison of a ultrasonic flaw detector against NIST-traceable reference standards. It quantifies the ultrasonic flaw detector’s error and measurement uncertainty and confirms it performs within tolerance, with as-found and as-left data on the certificate.
How often should a ultrasonic flaw detector be calibrated?
Most quality systems calibrate a ultrasonic flaw detector every 12 months, or sooner after repair, overload, or before critical measurements. Set your interval from the manufacturer spec and your ISO 9001 / 13485 / AS9100 program and drift history.
Is Techmaster’s ultrasonic flaw detector calibration ISO 17025 accredited?
No. Techmaster Electronics is ISO/IEC 17025:2017 accredited by ANAB (Certificate AC-1736), but ultrasonic flaw detector calibration is not on that scope. Every ultrasonic flaw detector calibration is NIST-traceable and issued with a full measurement-uncertainty budget.
What is the turnaround for ultrasonic flaw detector calibration?
Standard turnaround is 5 business days, with 1–2 business-day expedite available. On-site calibration removes shipping time entirely for ultrasonic flaw detectors that can’t leave the floor.
Do you calibrate ultrasonic flaw detectors on-site or in-lab?
Both. Techmaster runs five US labs (Vista CA, Santa Clara CA, Orlando FL, San Antonio TX, Holly Springs NC) and offers nationwide on-site ultrasonic flaw detector calibration to minimize downtime.

Khanh Nguyen is the Marketing Manager at Techmaster Electronics, a B2B marketing leader covering the test, measurement, and ISO/IEC 17025 accredited calibration industry across the US and Vietnam markets.