
Ultrasonic Flaw Detector Calibration: Step-by-Step Guide
For Non-Destructive Testing (NDT) professionals, quality managers, and field inspection engineers, regular ultrasonic flaw detector calibration is essential for accurate inspections. Over time, heat, daily use, and aging can affect the detector’s internal circuits. As a result, the instrument may show incorrect signal levels or flaw depths. Therefore, regular calibration helps maintain accurate results and supports safe, reliable inspections.
Ultrasonic flaw detector calibration is not on Techmaster’s ANAB ISO/IEC 17025 scope (certificate AC-1736). We calibrate ultrasonic flaw detectors with NIST-traceable reference standards and issue a NIST-traceable certificate. See what is on our accredited scope.
1. Technical Principles of Ultrasonic Flaw Detection
How does an ultrasonic flaw detector find internal defects?
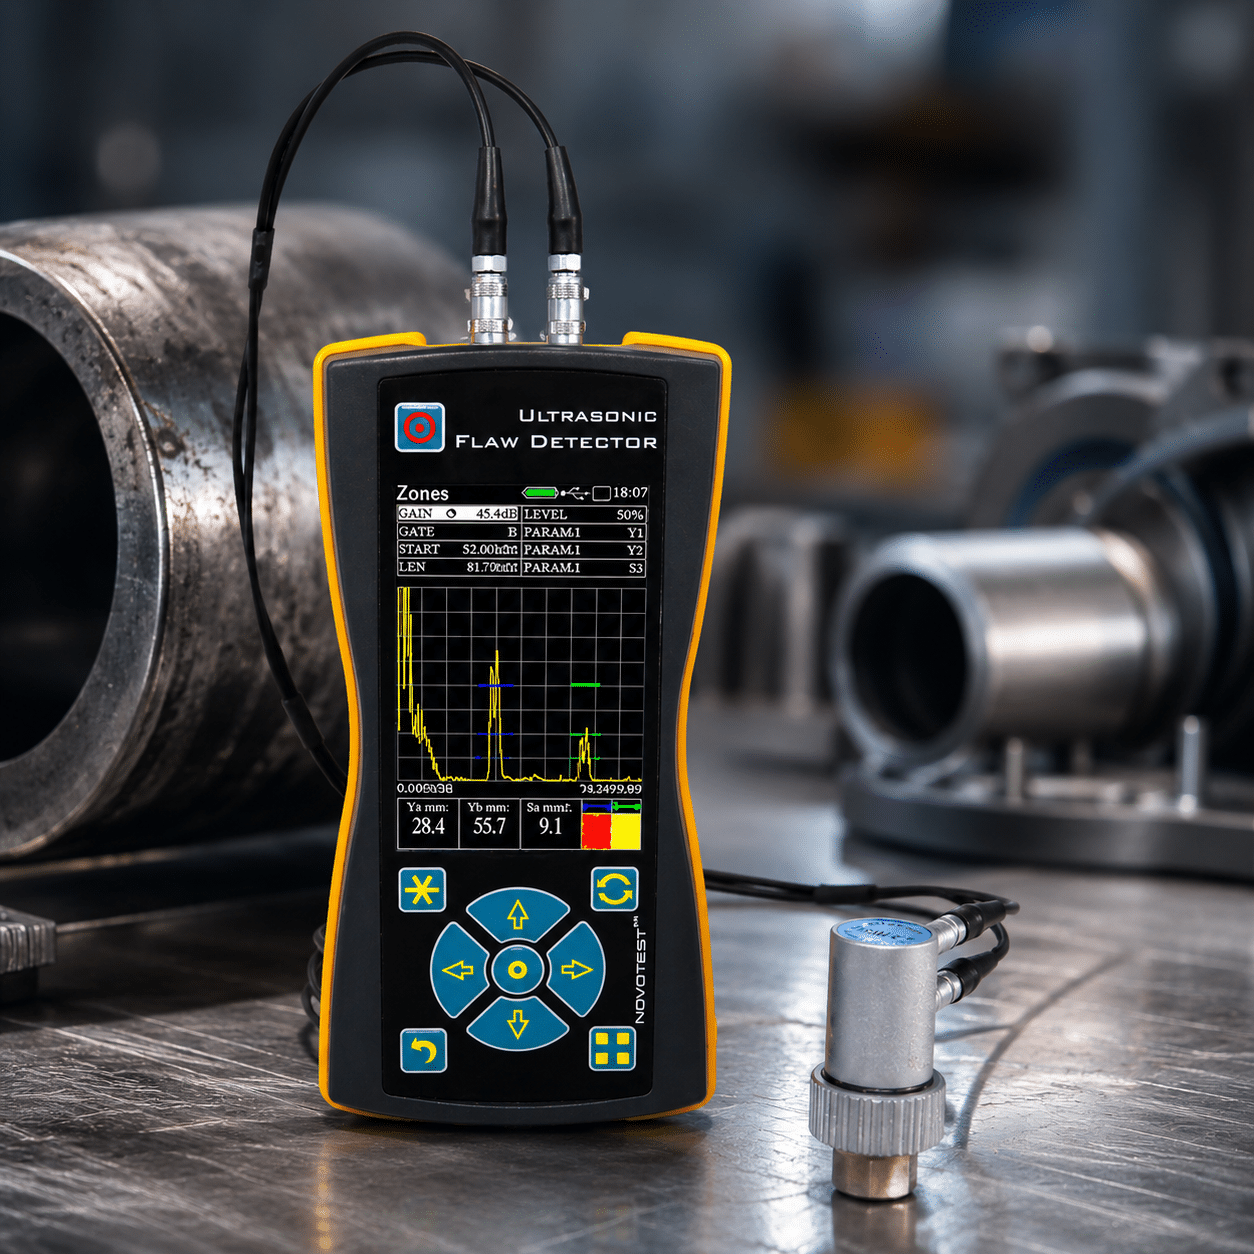
An ultrasonic flaw detector uses high-frequency sound waves to inspect the inside of a material without cutting or damaging it. Typically, these sound waves range from 0.5 MHz to 25 MHz.
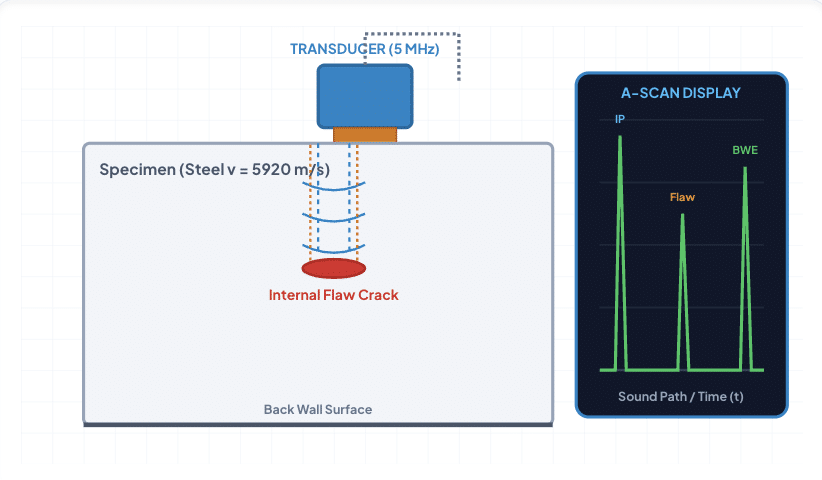
First, the instrument sends an electrical pulse to a piezoelectric transducer. Next, the transducer changes this pulse into a sound wave and sends it into the test material.
When the sound wave reaches a material boundary or internal defect, part of the wave returns to the transducer. For example, cracks, voids, and inclusions can reflect part of the sound wave because they have different acoustic properties.
The detector then changes the returned signal into an electrical signal and shows it as an A-scan waveform. Therefore,inspectors can use the signal to estimate the location and size of a defect.
The basic acoustic impedance formula is: Z=ρ⋅v
where Z represents acoustic impedance, ρ represents material density, and v represents sound velocity.
To ensure accurate results, calibration should check several key functions.
1.1. Time-Base Linearity and Sound Velocity
First, technicians check the time base and sound velocity settings. The detector must measure the travel time of the sound wave correctly. As a result, inspectors can calculate the correct depth of an internal flaw.
The basic depth formula is: d=v⋅t2
where d represents flaw depth, v represents sound velocity, and t represents sound travel time.
1.2. Amplifier and Attenuator Linearity
Next, technicians check the gain and attenuator controls. This step confirms that changes in signal strength appear correctly on the display. As a result, inspectors can compare signals from different defects with greater confidence.
1.3. Pulser and Receiver Performance
In addition, calibration checks the pulser and receiver response. The test confirms that the instrument produces the correct pulse and receives signals across its rated frequency range.
1.4. Electronic Drift
Finally, calibration helps identify changes in internal electronic circuits. Over time, heat and repeated use can change the performance of amplifiers, converters, and timing circuits. Therefore, regular calibration helps keep the detector within its required accuracy limits.
2. Industrial Applications: Where NDT Accuracy Matters
Which industries rely on ultrasonic inspection?
Many industries use ultrasonic testing because it can find internal defects without damaging the test part. In particular, it plays an important role in industries where material failure can create serious safety risks.
- Aerospace Engineering: For example, aerospace teams use ultrasonic testing to inspect composite structures, turbine blades, and landing gear parts. In this way, inspectors can find internal cracks, delamination, and other hidden defects before parts enter service.
- Oil and Gas: Similarly, oil and gas companies use ultrasonic testing to inspect pipelines, pressure vessels, and offshore equipment. As a result, inspectors can find wall thinning, corrosion, and cracks before they cause equipment failure.
- Civil Infrastructure: In addition, inspection teams use ultrasonic testing on bridges, structural steel, and important welds. Therefore, they can find hidden problems and support safe maintenance work.
- Automotive and Heavy Manufacturing: Likewise, automotive and heavy equipment manufacturers inspect engine blocks, crankshafts, welds, and other parts. This helps production teams identify internal defects before final assembly or delivery.
3. The Calibration Pillar: ISO/IEC 17025 Compliance
Pulse-Echo Propagation & A-Scan Waveform Display
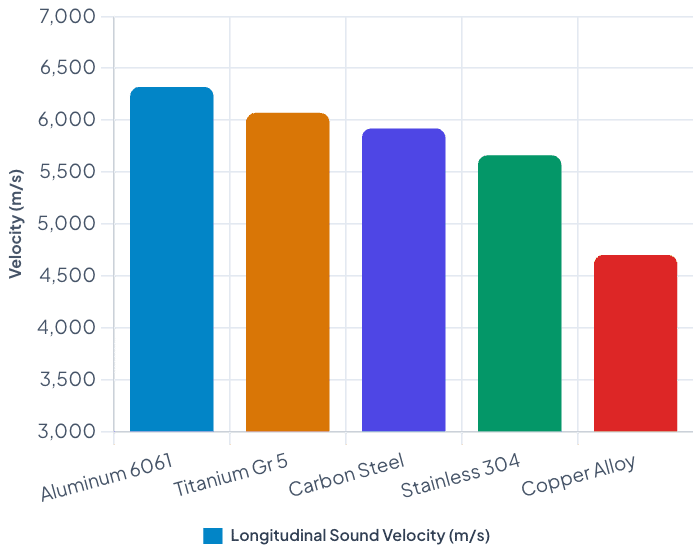
Longitudinal Sound Velocity in Engineering Alloys
Why is ISO/IEC 17025 important for ultrasonic calibration?
ISO/IEC 17025 is an international standard for testing and calibration laboratories. In particular, it sets requirements for technical skill, measurement control, and traceable results.
When you use an ISO/IEC 17025 accredited laboratory, technicians evaluate the instrument with suitable reference standards. In addition, the calibration record includes measurement results and uncertainty information.
As a result, your team has clear evidence that the ultrasonic flaw detector meets its required performance level.
An uncalibrated detector can create serious inspection risks. For example, electronic drift may change the displayed signal or flaw depth. Consequently, an inspector could miss a real defect or reject a good component.
Therefore, regular calibration is an important part of an effective NDT quality program.
4. How to Verify Ultrasonic Flaw Detector Performance
Step-by-step pre-inspection verification guide
Before starting an inspection, perform a basic performance check. This helps confirm that the detector and probe are ready for use.
- Warm Up the Instrument: First, turn on the detector and allow it to warm up for 15 to 30 minutes. During this time, the internal electronics can reach a stable operating condition.
- Inspect the Connectors and Transducer: Next, check the probe, cable, and connectors. Also, inspect the transducer face for cracks, wear, or other damage.
- Perform Velocity Calibration: Then, place the transducer on a certified calibration block, such as an IIW or V1 block. After that, use known material thickness points to set the correct sound velocity.
- Check Time-Base Linearity: Next, check several back-wall echoes on the calibration block. This confirms that the detector displays signal arrival times correctly across the screen.
- Check Vertical Gain Linearity: Finally, adjust the gain and compare known signal levels. For example, a 2:1 change in signal amplitude should produce the expected 6 dB change on the display.
By following these steps, technicians can confirm basic detector performance before beginning the inspection.
Frequently Asked Questions (FAQs)
1. What does ultrasonic flaw detector calibration include?
Ultrasonic flaw detector calibration checks key functions such as time-base accuracy, vertical gain, pulser output, attenuator response, and display performance. In addition, the process checks whether the electronic unit meets its required specifications.
2. How often should an ultrasonic flaw detector be calibrated?
In general, annual calibration is a common interval for industrial NDT equipment. However, high-use environments may need calibration every six months. Similarly, aerospace and other safety-critical applications may require shorter intervals based on company procedures and risk.
3. What is the difference between daily field checks and accredited calibration?
Daily field checks help confirm that the instrument works correctly before an inspection. For example, technicians can use a reference block to check velocity, zero, and signal response.
In contrast, accredited calibration provides a deeper check of the instrument’s internal electronics. It also compares measurement results with traceable reference standards.
4. How does electronic drift affect ultrasonic testing?
Over time, heat, component aging, and regular use can change the detector’s internal timing and gain circuits. As a result, the instrument may show incorrect flaw depth or signal amplitude.
5. Can daily field checks replace professional calibration?
No. Although daily checks help confirm normal operation, they do not replace professional calibration. Instead,accredited calibration provides a more complete check of the instrument’s internal measurement functions.
6. How often should I check an ultrasonic flaw detector before use?
Typically, technicians should perform a basic function check before each inspection or work shift. In addition, they should follow the equipment manufacturer’s instructions and their company’s NDT procedures.
7. Can Techmaster US perform on-site calibration for ultrasonic NDT equipment?
Techmaster Electronics calibrates ultrasonic flaw detectors with NIST-traceable reference standards, including on-site support. Flaw detector calibration is not on our ANAB ISO/IEC 17025 scope. As a result, customers can verify their equipment at their facility while reducing shipping and equipment downtime.
Techmaster US: Expert Metrology & NDT Calibration Services
Techmaster Electronics, LLC is an ISO/IEC 17025 accredited calibration laboratory with ANAB Certificate AC-1736. Since 1989, the company has supported customers with high-accuracy calibration services.
Techmaster provides electrical, dimensional, and NDT equipment calibration using traceable measurement standards. In addition, the company offers both laboratory and on-site services.
Why Choose Techmaster US?
- Accredited laboratory: Techmaster is accredited to ISO/IEC 17025 by ANAB (AC-1736); ultrasonic flaw detector calibration itself is NIST-traceable and not on that scope.
- On-Site Capability: Field technicians can perform calibration at your facility. Therefore, you can reduce equipment shipping and production downtime.
- Multiple Laboratory Locations: Techmaster operates accredited laboratories in California, Florida and Texas, plus a lab in North Carolina. As a result, customers can access local support and faster service.
- Comprehensive Metrology Support: The team supports a wide range of electrical, dimensional, and NDT calibration needs.
- Contact Techmaster US today to discuss your ultrasonic flaw detector calibration needs and build a calibration schedule that supports accurate, reliable, and compliant NDT inspections.
Ultrasonic Flaw Detector Calibration Step-by-Step Guide
Technical guide on acoustic measurement integrity, pulser/receiver electronic drift prevention, time-base linearity, vertical gain accuracy, and pre-inspection verification.
COTACT USReferences & industry standards
- ISO/IEC 17025 testing & calibration laboratory requirements
- NIST calibration services and measurement traceability
- A2LA / ANAB accreditation for calibration laboratories
External standards bodies. Techmaster Electronics is an ISO/IEC 17025-accredited, NIST-traceable calibration laboratory.
Frequently asked questions
What is ultrasonic flaw detector calibration?
Ultrasonic Flaw Detector Calibration is the documented comparison of a ultrasonic flaw detector against NIST-traceable reference standards. It quantifies the ultrasonic flaw detector’s error and measurement uncertainty and confirms it performs within tolerance, with as-found and as-left data on the certificate.
How often should a ultrasonic flaw detector be calibrated?
Most quality systems calibrate a ultrasonic flaw detector every 12 months, or sooner after repair, overload, or before critical measurements. Set your interval from the manufacturer spec and your ISO 9001 / 13485 / AS9100 program and drift history.
Is Techmaster’s ultrasonic flaw detector calibration ISO 17025 accredited?
No. Techmaster Electronics is ISO/IEC 17025:2017 accredited by ANAB (Certificate AC-1736), but ultrasonic flaw detector calibration is not on that scope. Every ultrasonic flaw detector calibration is NIST-traceable and issued with a full measurement-uncertainty budget.
What is the turnaround for ultrasonic flaw detector calibration?
Standard turnaround is 5 business days, with 1–2 business-day expedite available. On-site calibration removes shipping time entirely for ultrasonic flaw detectors that can’t leave the floor.
Do you calibrate ultrasonic flaw detectors on-site or in-lab?
Both. Techmaster runs five US labs (Vista CA, Santa Clara CA, Orlando FL, San Antonio TX, Holly Springs NC) and offers nationwide on-site ultrasonic flaw detector calibration to minimize downtime.

Khanh Nguyen is the Marketing Manager at Techmaster Electronics, a B2B marketing leader covering the test, measurement, and ISO/IEC 17025 accredited calibration industry across the US and Vietnam markets.