
How to Use a Universal Testing Machine: Setup, Operation & Best Practices
In materials testing, construction, and aerospace manufacturing, engineers use a universal testing machine (UTM) to measure how materials respond to force. Knowing how to use a universal testing machine correctly helps produce accurate and repeatable results for tensile strength, yield strength, elastic modulus, and elongation. However, correct operation requires more than applying force. The operator must also choose the right grips, align the specimen, check the load cell, and set the test speed correctly. In addition, proper safety checks help protect both the equipment and laboratory staff.
1. Technical Principles: Force, Measurement, and Machine Movement
1.1. How a Universal Testing Machine Works
A universal testing machine applies a controlled force to a test specimen. Depending on the test setup, the machine can apply tension, compression, or bending force. Modern UTMs usually use either an electric drive with ball screws or a servo-hydraulic system. In both cases, the machine controls the force or movement while sensors record the test data. During a tensile test, the load cell measures the applied force. At the same time, an extensometer measures how much the specimen stretches.
The machine then uses these values to calculate stress and strain.
Engineering Stress = Force / Original Cross-Sectional Area
Engineering Strain = Change in Length / Original Gauge Length
Where:
- Force is the load applied to the specimen.
- Original Cross-Sectional Area is the specimen area before testing.
- Change in Length is the measured extension.
- Original Gauge Length is the starting length used for the strain measurement.
Within the elastic range, the machine can also determine Young’s modulus:
Young’s Modulus = Stress / Strain
Therefore, accurate force and extension measurements are essential for reliable material test results.
1.2. Common Sources of Measurement Error
Several factors can affect UTM results. Therefore, operators should check the machine and test setup before each important test.
- Specimen Misalignment: First, poor alignment can add bending force to the specimen. As a result, the sample may not receive a uniform load.
- Hydraulic Temperature Changes: Next, hydraulic systems can heat during long tests. This temperature change may affect system response and measurement stability.
- Frame Deflection: In addition, the machine frame can move slightly under high loads. Therefore, the system must account for frame movement when displacement measurements depend on crosshead travel.
- Load Cell Drift: Finally, temperature changes and electronic drift can affect the load cell signal. Regular zero checks and calibration help control this error.
2. Industrial Applications: Material Testing and Quality Control

Universal testing machines are used in many industries. For example, manufacturers use them to check metals, plastics, composites, and other materials.
Common applications include:
- Construction Steel Testing: Engineers use UTMs to test steel bars and other structural materials for strength and elongation.
- Aerospace Materials: Quality teams test aluminum, titanium, nickel, and other alloys used in aircraft components.
- Automotive Materials: Testing labs measure the strength and deformation of sheet metal, welds, and other vehicle materials.
- Plastics and Composites: Manufacturers perform tensile and flexural tests to check the strength and stiffness of polymer and composite parts.
In addition, UTMs can support product development, incoming material inspection, failure analysis, and production quality control.
3. How to Set Up and Use a Universal Testing Machine
Follow these steps before and during a test. However, always follow the machine manufacturer’s instructions and the applicable test standard for the specific test.
1. Inspect the Machine
First, inspect the machine before turning it on.
Check the frame, columns, grips, cables, emergency stop controls, and other visible parts. For hydraulic machines, also check the hydraulic fluid level and look for leaks.
Next, confirm that the test area is clear and that the safety enclosure works correctly.
2. Start the Controller and Allow the Machine to Stabilize
After the initial inspection, turn on the machine and control system.
Allow enough warm-up time for the load cell, electronics, and hydraulic system to stabilize. The required time depends on the machine and the manufacturer’s instructions.
Meanwhile, check the display for warning messages or abnormal readings.
3. Select the Correct Grips or Fixtures
Next, choose grips or fixtures that match the test specimen.
For tensile tests, the machine may use wedge grips, hydraulic grips, or other suitable jaws. For compression tests, use the correct compression platens.
In addition, make sure the grips can handle the expected test force.
4. Align and Install the Specimen
Then, place the specimen carefully in the grips.
Align the specimen with the machine’s loading axis. After that, tighten the grips evenly and securely.
Avoid applying unnecessary preload. Otherwise, the specimen may begin the test with an incorrect starting load.
5. Zero the Load Channel and Attach the Extensometer
Before starting the test, check the load reading and zero the channel if required.
Next, attach the extensometer to the correct gauge section of the specimen. Make sure it is secure and aligned with the test direction.
If you use a non-contact extensometer, check that the camera or optical system can clearly track the required measurement area.
6. Close the Safety Shield
Before applying force, close the protective enclosure.
This step is especially important for tests that may cause the specimen to break suddenly. Also, make sure the emergency stop button remains easy to reach.
Do not stand in front of the specimen or enter the test area while the machine is applying force.
7. Set the Test Method
Next, enter the required test settings into the controller.
Depending on the test standard, these settings may include:
- Test speed
- Force limit
- Extension limit
- Strain rate
- Data recording rate
- Specimen dimensions
- Gauge length
- Test type
Then, review the settings before starting the test.
8. Start the Test and Monitor the Data
Finally, start the test and watch the load and extension data.
The force should increase smoothly according to the selected test method. At the same time, check the stress-strain curve for unusual changes.
If the specimen slips, the load signal becomes unstable, or another abnormal condition appears, stop the test when it is safe to do so.
After the test, save the data and record the test conditions.
4. Best Practices for Reliable UTM Testing
To improve test results, follow these basic practices:
- Use the correct grip and fixture for the specimen.
- Keep the specimen aligned with the loading axis.
- Check the load cell before critical tests.
- Use the correct specimen dimensions in the software.
- Verify the test speed before starting.
- Allow the machine to warm up when required.
- Keep grips clean and free from damage.
- Use an extensometer that matches the test range.
- Record unusual events such as specimen slip or early fracture.
- Follow the applicable ASTM, ISO, or other test method.
- Keep calibration records for the load and measurement systems.
Most importantly, do not change test settings without checking the applicable test method. Even a small change in speed, alignment, or specimen dimensions can affect the final result.
Frequently Asked Questions (FAQs)
1. How to use a universal testing machine safely during high-tonnage tensile testing?
To use a universal testing machine safely, always close polycarbonate safety shields around the test frame, wear protective eyewear, ensure emergency stop buttons are accessible, and never exceed rated frame or load cell force capacities during specimen testing.
2. What is the difference between electromechanical and servo-hydraulic universal testing machines?
Electromechanical testing machines use electric motors and precision ball screws to generate motion for low-to-medium force applications. Servo-hydraulic testing machines use pressurized hydraulic fluid and servo-valves to generate extreme forces, making them ideal for high-tonnage metal rebar and fatigue testing.
3. Why is specimen alignment critical when operating a universal testing machine?
Specimen alignment is critical because off-axis or eccentric clamping introduces unmeasured bending moments into the sample. This off-center force distribution causes localized stress concentrations, leading to premature material fracture and invalid yield strength data.
4. How often should a universal testing machine be calibrated?
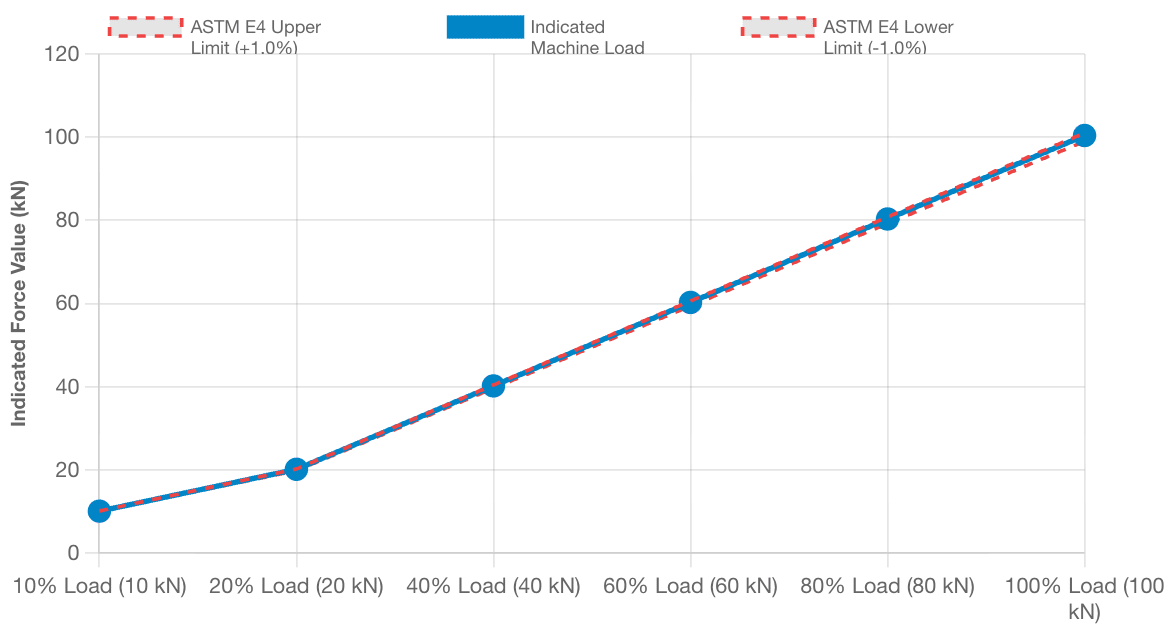
A universal testing machine should undergo ISO/IEC 17025 accredited force calibration every 12 months in accordance with ASTM E4 and ISO 7500-1 requirements. High-tonnage hydraulic machines operating in continuous multi-shift production environments should be calibrated every 6 months.
5. What causes specimen slippage in universal testing machine grips?
Specimen slippage is caused by incorrect wedge jaw tooth profiles, insufficient hydraulic clamping pressure, or worn grip faces. Slippage creates artificial strain plateaus on the stress-strain curve, ruining elastic modulus and elongation calculations.
Conclusion
Knowing how to use a universal testing machine correctly helps laboratories produce reliable material test results. First, inspect the machine and choose the correct grips. Next, align the specimen and check the load measurement system. Then, set the correct test method and close the safety enclosure. During the test, monitor the force, displacement, and stress-strain data. Finally, review and save the test results after the specimen reaches the required test condition. By following these steps, laboratories can improve test consistency, reduce measurement errors, and operate universal testing machines more safely.
Universal Testing Machine Master Guide
Complete operational reference for setup, alignment, signal path architecture, stress-strain calculations, error reduction, and ISO/IEC 17025 accredited force calibration.
CONTACT USReferences & industry standards
- ISO/IEC 17025 testing & calibration laboratory requirements
- NIST calibration services and measurement traceability
- A2LA / ANAB accreditation for calibration laboratories
External standards bodies. Techmaster Electronics is an ISO/IEC 17025-accredited, NIST-traceable calibration laboratory.
Frequently asked questions
What is universal testing machine calibration?
Universal Testing Machine Calibration is the documented comparison of a universal testing machine against NIST-traceable reference standards under ISO/IEC 17025. It quantifies the universal testing machine’s error and measurement uncertainty and confirms it performs within tolerance, with as-found and as-left data on the certificate.
How often should a universal testing machine be calibrated?
Most quality systems calibrate a universal testing machine every 12 months, or sooner after repair, overload, or before critical measurements. Set your interval from the manufacturer spec and your ISO 9001 / 13485 / AS9100 program and drift history.
Is Techmaster’s universal testing machine calibration ISO 17025 accredited?
Yes. Techmaster Electronics is ISO/IEC 17025:2017 accredited by ANAB (Certificate AC-1736). Every universal testing machine calibration is NIST-traceable and issued with a full measurement-uncertainty budget.
What is the turnaround for universal testing machine calibration?
Standard turnaround is 5 business days, with 1–2 business-day expedite available. On-site calibration removes shipping time entirely for universal testing machines that can’t leave the floor.
Do you calibrate universal testing machines on-site or in-lab?
Both. Techmaster runs five US labs (Vista CA, Santa Clara CA, Orlando FL, San Antonio TX, Holly Springs NC) and offers nationwide on-site universal testing machine calibration to minimize downtime.

Calibration engineer at Techmaster Electronics, ISO/IEC 17025 accredited laboratory with 35+ years of metrology expertise.